1. EMEWS Introduction and Quickstart
1.1. Extreme-scale Model Exploration with Swift (EMEWS)
Modern computational studies, involving simulation, AI/ML, or other black-box models, are campaigns consisting of large numbers of these models with many possible variations. The models may be run with different parameters, possibly as part of an automated model parameter optimization, classification, or, more generally, model exploration (ME). Constructing the software to run such studies at the requisite computational scales is often unnecessarily time-consuming and the resulting software artifacts are typically difficult to generalize and package for other users.
In this tutorial, we present a solution for many of the challenges in running large-scale ME studies. Our framework, Extreme-scale Model Exploration with Swift (EMEWS) (Ozik et al. 2016), provides ready-to-use workflows developed in the general-purpose parallel scripting language Swift/T (Wozniak et al. 2013). These workflows are designed so that most of the interesting control logic is performed in the mathematically-oriented ME. The general-purpose nature of the programming model also allows the user to supplement the workflows with additional analyses and post-processing. The Appendix: Using Swift/T is provided for cases in which customized use of Swift/T is required.
Our focus is on computational models that require the use of approximate, heuristic ME methods involving large ensembles. To improve the current state of the art it has been noted elsewhere that: “… there is a clear need to provide software frameworks for metaheuristics that promote software reuse and reduce developmental effort” (Boussaïd, Lepagnot, and Siarry 2013). Our design goals are to ease software integration while providing scalability to the largest scale (exascale plus) supercomputers, running millions of models, thousands at a time. EMEWS has shown robust scalability (Ozik et al. 2021; Wozniak et al. 2018). The tools are also easy to install and run on an ordinary laptop, requiring only an MPI (Message Passing Interface) implementation, which can be easily obtained from common OS package repositories.
1.1.1. EMEWS workflow structure
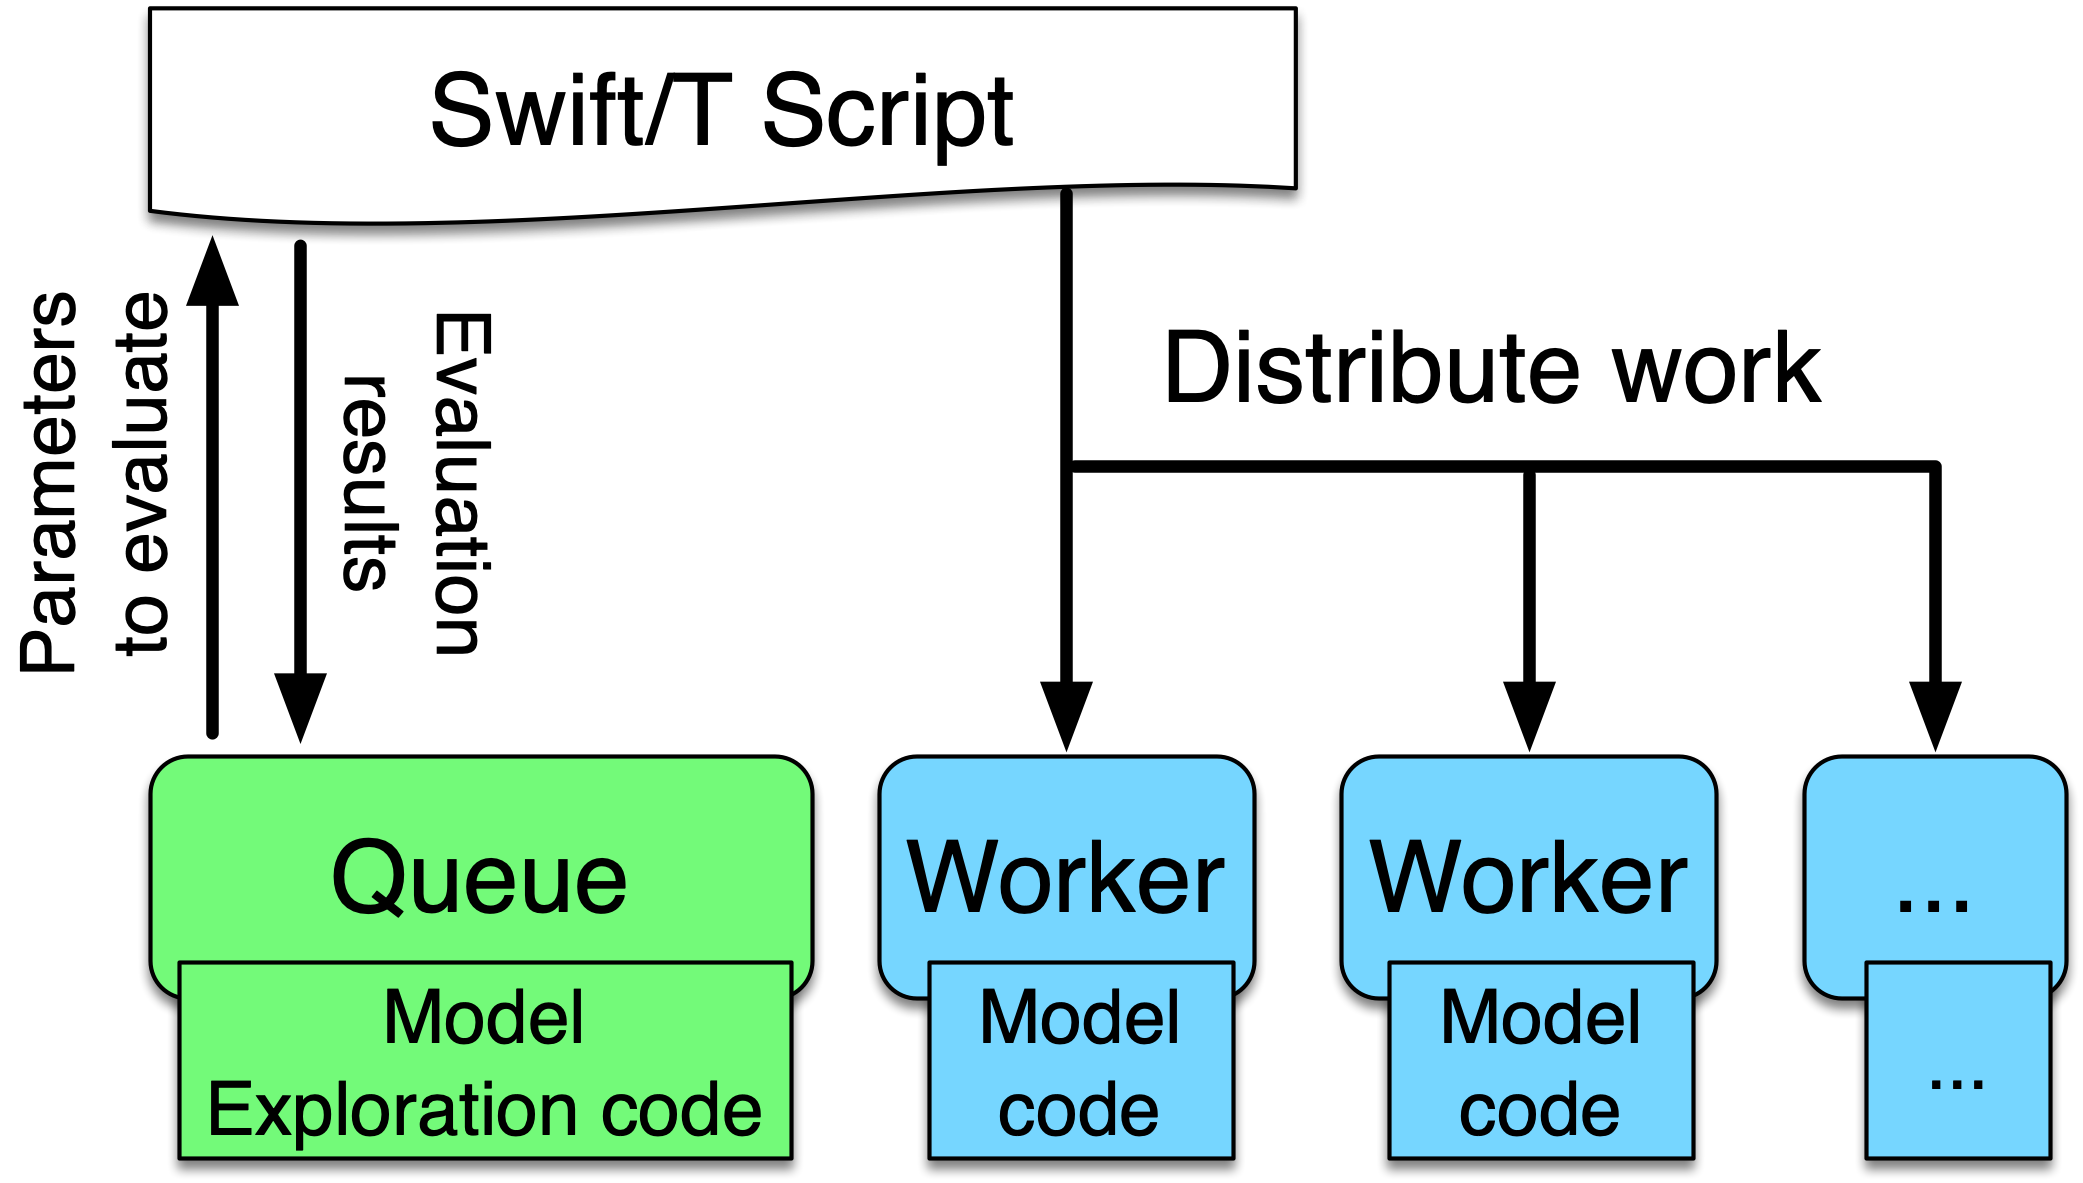
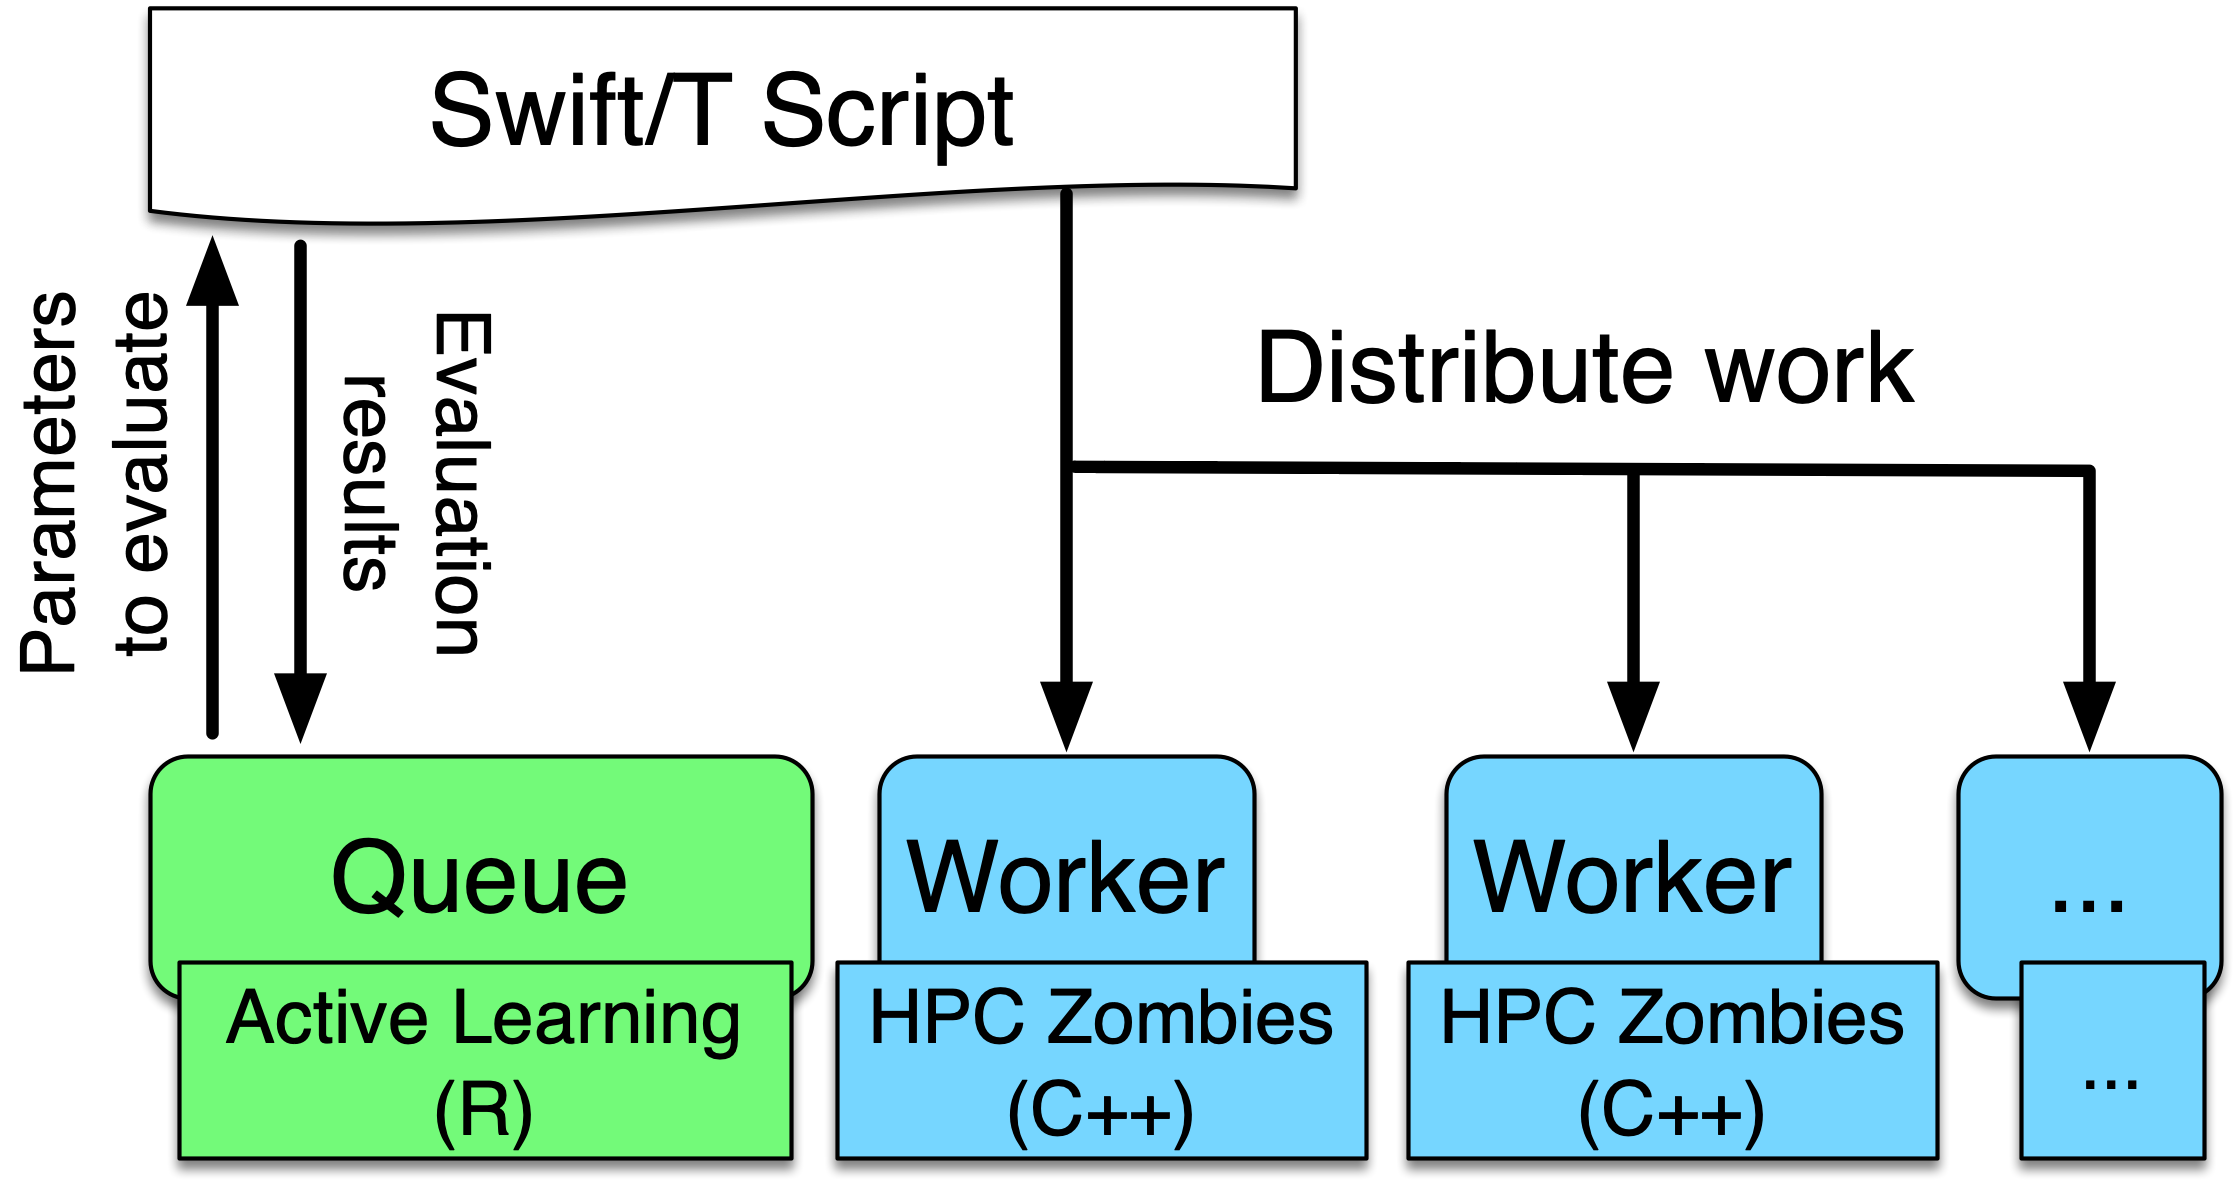
This figure illustrates the main components of the EMEWS framework. The main user interface is the Swift script, a high-level program. The core novel contributions of EMEWS are shown in green, these allow the Swift script to access a running ME algorithm.
The ME algorithm can be expressed in Python, R, C, C++,
Fortran, Julia, Tcl, or any language supported by Swift/T. We provide
a high-level queue-like interface with (currently) three
implementations: EQ/Py, EQ/R, and EQSQL (EMEWS Queues for
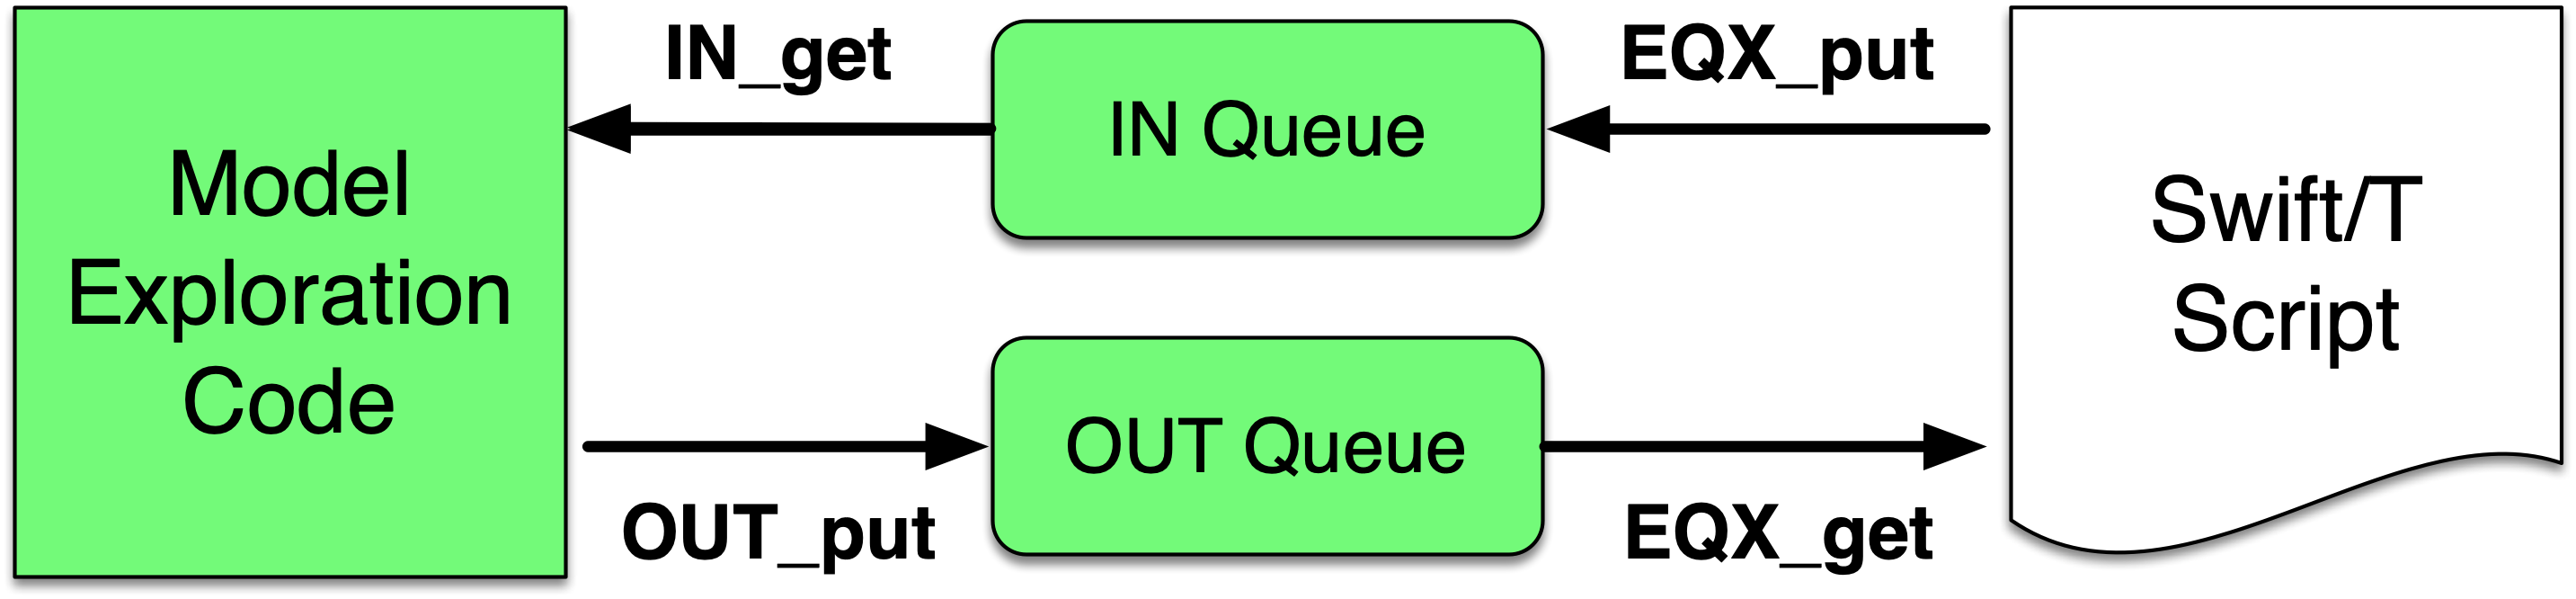
Python, R, and SQL). The interface defines the two functions OUT_put and IN_get for sending candidate model parameters from the ME algorithm to the Swift script and getting model outputs back, respectively. The interface also allows the Swift script to obtain
candidate model parameter inputs (EQX_get) and return model outputs to the ME (EQX_put). The models are distributed over large and distributed computer system, but smaller systems that run one
model at a time are also supported. The models can be
implemented as external applications called through the shell, built-in interpreters, or
in-memory libraries accessed directly by Swift (for faster
invocation).
EMEWS thus offers the following contributions to the science and practice of computational ME studies:
-
It offers the capability to run very large, complex, and highly concurrent ensembles of models of varying types on a broad range of individual or distributed computing resources;
-
It supports a wide class of model exploration algorithms, including those increasingly available to the community via Python and R libraries;
-
It offers a software sustainability solution, in that computational workflows based around EMEWS can easily be compared and distributed.
1.1.2. Tutorial Goals
This tutorial aims to describe through examples the following main elements of the EMEWS framework:
-
How external ME code can be incorporated with minimal modifications
-
How the EMEWS Queues (EQ/Xs) are used to communicate between model exploration code and Swift workers
-
How EMEWS enables the scaling of simulation and black box model exploration to large and distributed computing resources
-
How modularized, multi-language code can be effectively tested and integrated within the EMEWS framework
1.1.4. EMEWS Mailing List
For questions about EMEWS or to access archived questions, please subscribe to the EMEWS mailing list: https://lists.mcs.anl.gov/mailman/listinfo/emews
1.1.5. Citing EMEWS
To cite EMEWS, please use:
Ozik, Jonathan, Nicholson T. Collier, Justin M. Wozniak, and Carmine Spagnuolo. 2016. “From Desktop to Large-Scale Model Exploration with Swift/T.” In 2016 Winter Simulation Conference (WSC), 206–20. https://doi.org/10.1109/WSC.2016.7822090.
1.1.6. Acknowledgments
Research reported in this website was supported by the National Science Foundation (2200234), the National Institutes of Health (R01GM115839, R01DA039934, R01DA055502), the U.S. Department of Energy, Office of Science, under contract number DE-AC02-06CH11357, and the DOE Office of Science through the Bio-preparedness Research Virtual Environment (BRaVE) initiative. The content is solely the responsibility of the authors and does not necessarily represent the official views of the National Science Foundation or the National Institutes of Health.
1.2. Quickstart
The EMEWS installer will create a binary EMEWS environment (Swift/T, Python, R, and the EMEWS Python and R packages). The binary install is recommended for the tutorial and for small scale testing on non-HPC supported systems.
| See the EMEWS Install section for additional details about the install script, and other kinds of installs, e.g., targeting HPC systems. |
-
Install Conda
The EMEWS binary install is a conda environment, and requires a conda installation as a prerequisite. Please install miniforge, anaconda, or miniconda if you do not have an existing conda installation. For the differences between the three with respect to Anaconda’s Terms of Service and remaining in compliance with those terms, see is conda free.
For more information on conda enviroments see here -
Download the installer files
$ curl -L -O https://raw.githubusercontent.com/jozik/emews_next_gen_tutorial_tests/main/code/install/install_emews.sh $ curl -L -O https://raw.githubusercontent.com/jozik/emews_next_gen_tutorial_tests/main/code/install/install_pkgs.R -
Run the Installer
$ bash install_emews.sh 3.11 ~/Documents/db/emews_dbThis will install the EMEWS environment with Python 3.11 and create the EMEWS DB database in the
~/Documents/db/emews_dbdirectory.The install script,
install_emews.sh, takes two arguments:$ bash install_emews.sh <python-version> <database-directory>-
The Python version to use - one of 3.8, 3.9, 3.10, or 3.11
-
The EMEWS DB database install directory - this must NOT already exist
The install will take a few minutes to download and install the necessary components, reporting its progress as each step completes. A detailed log of the installation can be found in
emews_install.login the same directory where the install script is run. The installer will create a conda environment namedemews-pyX.XXwhereX.XXis the Python version provide on the command line, i.e.,bash install_emews.sh install_emews.sh 3.11 ~/Documents/db/emews_dbcreates a conda environment namedemews-py3.11. The environment can found in theenvsdirectory of your conda installation. -
If any errors occur during the install, refer to emews_install.log for
more details.
|
When the install finishes sucessfully, the output should end with the following:
# To activate this EMEWS environment, use
#
#     $ conda activate emews-pyX.XX
#
# To deactivate an active environment, use
#
#     $ conda deactivate
In order to use the EMEWS environment, it must be activated. For example,
$ conda activate emews-py3.112. Simple Workflows with ABM
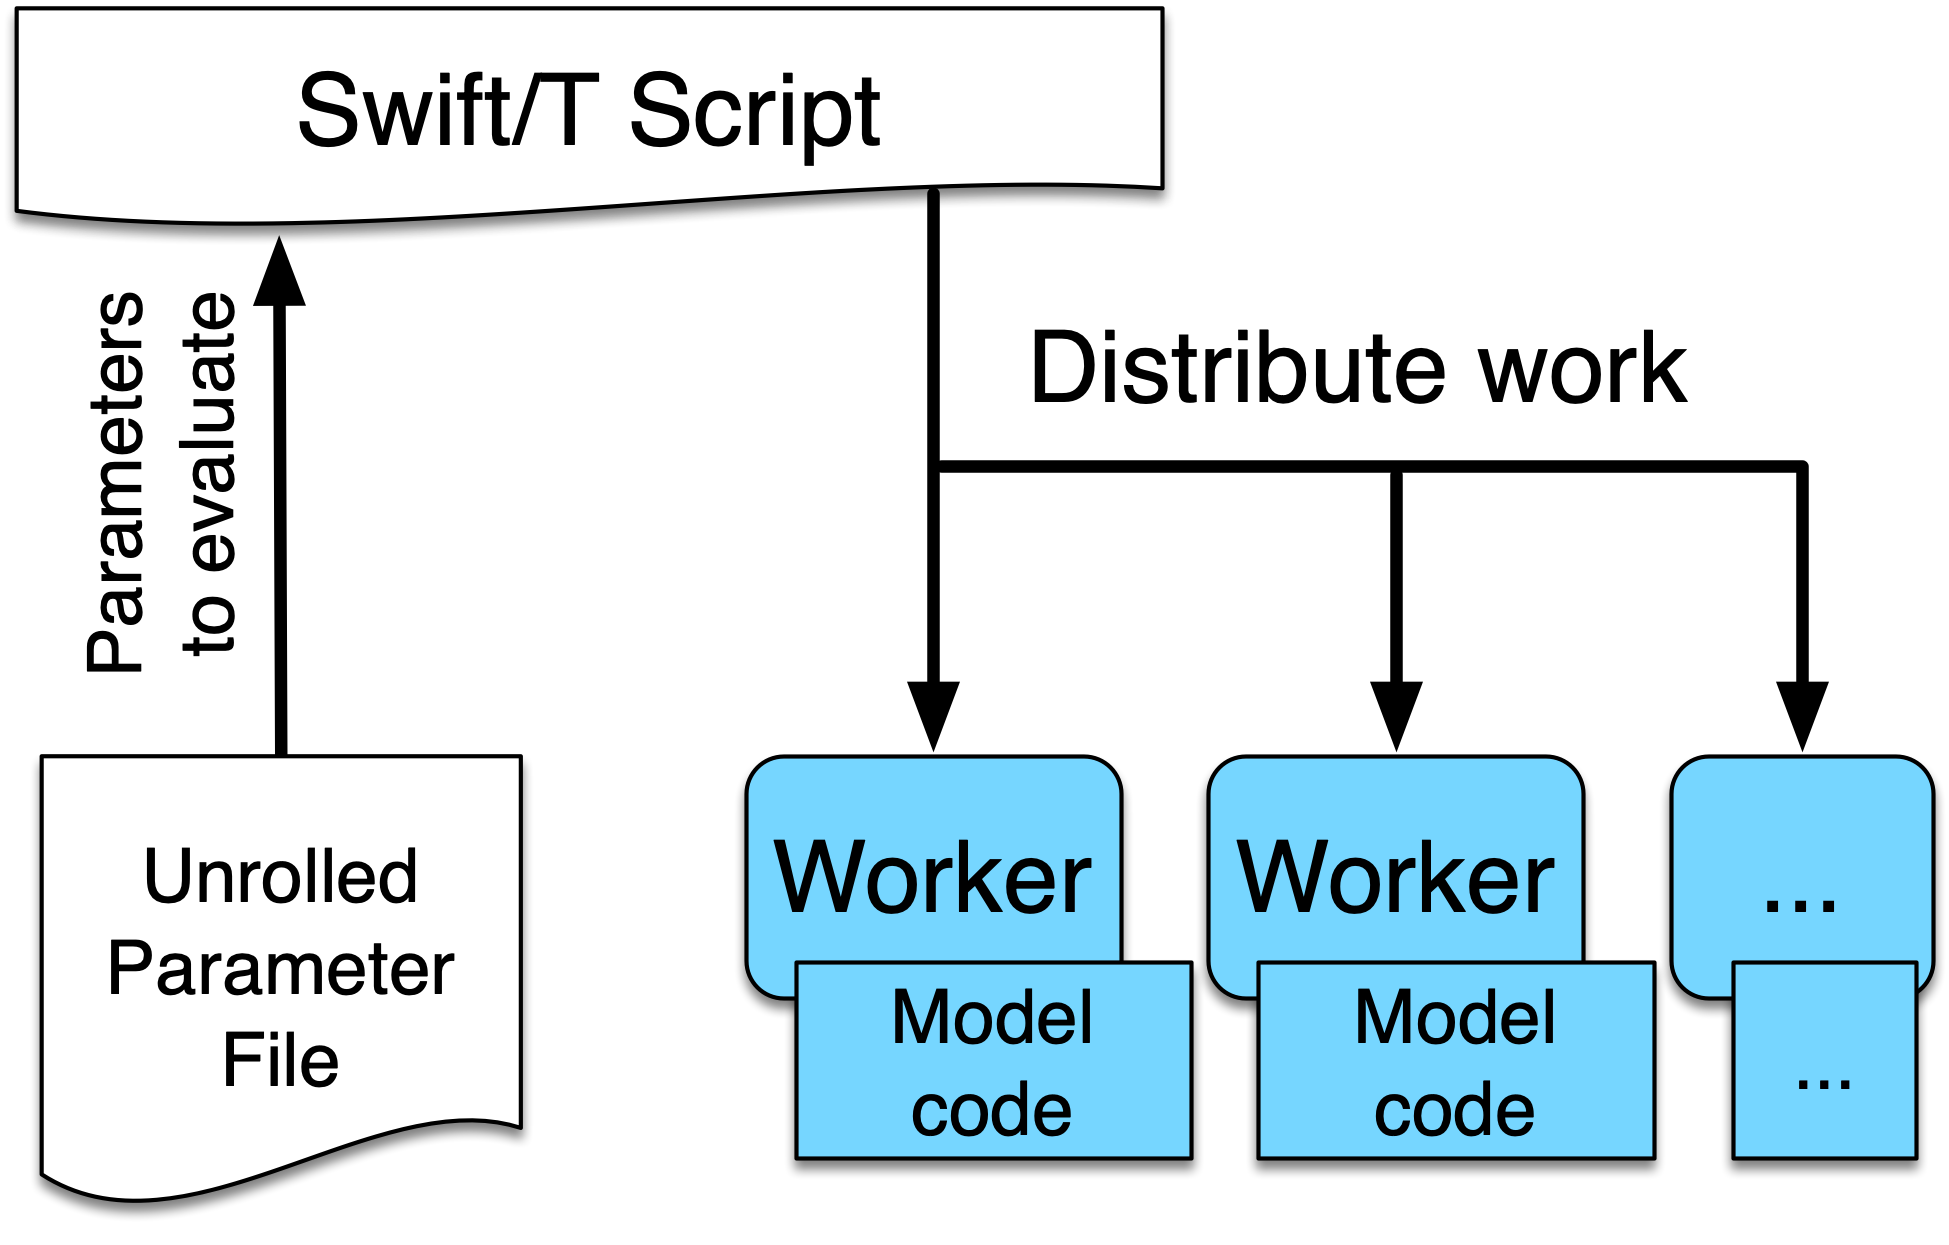
For a first demonstration use case, we begin with an example of a Swift/T parallel parameter sweep to explore the parameter space of an ABM. This tutorial uses the project structure and files created by the EMEWS project creator sweep template. The sweep workflow reads an input file, and runs an application using each line of the input file as input to an application run. We call this input file an unrolled parameter file or UPF file. The following is the EMEWS sweep workflow structure:
Further information about the EMEWS Creator tool and the various available templates can be found in the EMEWS Creator section.
|
This use case assumes that you have already installed EMEWS. See the Quickstart section for how to do this with a simple binary install on your local setup. For non-binary installations or for installing on HPC resources, see the EMEWS Install section. |
2.1. Tutorial goals
-
Run an ABM simulation using Repast in Swift/T
-
Execute parallel parameters sweep of ABM simulation model
-
Implement parallel evaluation of the simulation results using Swift/T and R
2.2. Workflow Project Structure
The full source code for this tutorial use case can be accessed here.
An initial version of the project was created using the EMEWS creator with the following command, issued from the tutorial code directory:
emewscreator -o uc1 sweep -c tutorial_cfgs/UC1.yamlHere UC1.yaml is a project configuration file that provides information to the EMEWS project creator. See the EMEWS Creator section for more information.
The completed workflow project has the following directory structure and files:
uc1
├── R
│   └── test
├── README.md
├── data
│   └── upf.txt
├── etc
│   └── emews_utils.sh
├── ext
│   └── emews
│       └── emews.swift
├── output
├── python
│   └── test
├── scripts
│   └── run_repast_uc1.sh
└── swift
    ├── cfgs
    │   └── uc1.cfg
    ├── run_uc1.sh
    ├── uc1.swift
└── uc1_R.swift|
If you haven’t installed the EMEWS stack using the EMEWS installer in the Quickstart section, you will need an R enabled Swift/T installation to run this use case. See the Swift/T R Installation Guide for installation details. |
2.3. JZombie: Repast simulation
The example model used here is an adaptation of the JZombies demonstration model distributed with Repast Simphony (Nick Collier and Michael North 2015). This is only an example model. Any simulation or scientific application that can be launched from the command line can be adapted to this paradigm. The fictional Zombies versus Humans model is intended to illustrate that EMEWS, Swift/T, and Repast Simphony are domain agnostic.
2.3.1. Model details
The model has two kinds of agents, Zombies and Humans. Zombies chase the Humans, seeking to infect them, while Humans attempt to evade Zombies. When a Zombie is close enough to a Human, that Human is infected and becomes a Zombie. During a typical run all the Humans will eventually become Zombies. These agents are located in a two dimensional continuous space where each agent has a x and y coordinate expressed as a floating point number (and in a corresponding discrete grid with integer coordinates). Movement is performed in the continuous space and translated into discrete grid coordinates. The grid is used for neighborhood queries (e.g., given a Zombie’s location, where are the nearest Humans). The model records the grid coordinate of each agent as well as a count of each agent type (Zombie or Human) at each time step and writes this data to two files. The initial number of Zombies and Humans is specified by model input parameters zombie count and human count, and the distance a Zombie or Human can move at each time step is specified by the parameters zombie step size and human step size.
2.4. Calling a Repast Simphony simulation from Swift/T
The full Swift/T script can be seen in uc1.swift. The script consists of defining variables from environment variables and user input:
string emews_root = getenv("EMEWS_PROJECT_ROOT");
string turbine_output = getenv("TURBINE_OUTPUT");

file model_sh = input(emews_root+"/scripts/run_repast_uc1.sh");
file upf = input(argv("f"));
and then defining four functions, one that calls the simulation, which is auto-generated by the EMEWS Creator command:
app (file out, file err) run_model(file shfile, string param_line, string instance)
{
    "bash" shfile param_line emews_root instance @stdout=out @stderr=err;
}
two utility functions we create:
app (void o) make_dir(string dirname) {
  "mkdir" "-p" dirname;
}

app (void o) run_prerequisites() {
  "cp" (emews_root+"/complete_model/MessageCenter.log4j.properties") turbine_output;
}
followed by the code that performs the sweep, auto-generated, with the run_prerequisites block uncommented:
main() {
  run_prerequisites() => {
    string upf_lines[] = file_lines(upf);
    foreach s,i in upf_lines {
      string instance = "%s/instance_%i/" % (turbine_output, i+1);
      make_dir(instance) => {
        file out <instance+"out.txt">;
        file err <instance+"err.txt">;
        (out,err) = run_model(model_sh, s, instance);
      }
    }
  }
}
Here we see how the EMEWS Creator allows for very minimal adjustment of the workflow code to adapt to specific use cases.
2.4.1. Calling the External Application
In order for Swift/T to call our external application (i.e., the Zombies model), we define an app function. (The Zombies model is written in Java which is not easily called via Tcl and thus an app function is the best choice for integrating the model into a Swift script. See the Swift/T Tutorial for more details.) Repast Simphony provides command line compatible functionality via an InstanceRunner class, for passing a set of parameters to a model and performing a single headless run of the model using those parameters. Using the InstanceRunner main class, Repast Simphony models can be launched by other control applications such as a bash, slurm, or Swift scripts. We have wrapped the command line invocation of Repast Simphony’s InstanceRunner in a bash script run_repast_uc1.sh to ease command line usage. Other non-Repast Simphony models or scientific applications with command line interfaces can be wrapped and run similarly.
The following is an annotated version of the Swift app function that calls the Repast Simphony model:
string emews_root = getenv("EMEWS_PROJECT_ROOT");  (1)
string turbine_output = getenv("TURBINE_OUTPUT");  (2)

app (file out, file err) run_model(file shfile, string param_line, string instance)  (3)
{
    "bash" shfile param_line emews_root instance @stdout=out @stderr=err;  (4)
}| 1 | Prior to the actual function definition, the environment variable EMEWS_PROJECT_ROOT is accessed. This variable is used to define the project’s top level directory, relative to which other directories (e.g., the directory that contains the Zombies model) are defined. |
| 2 | The value of the TURBINE_OUTPUT environment variable is also retrieved. This specifies the path to
a directory where Swift/T stores its log files and which we will use
as a parent directory for the working directories of our individual runs.
For more on these variables see the discussion in the
EMEWS Creator section. |
| 3 | The app function definition begins. The function returns two files, one for standard output and one for standard error. The function arguments are those required to run run_repast_uc1.sh, that is, the full path of the script, the parameters to run and the directory where the model run output should be written. |
| 4 | The body of the function calls the bash interpreter passing it the name of the script file to execute and the other function
arguments as well as the project root, that is, emews_root directory.
@stdout=out and @stderr=err redirect stdout and stderr to the files out and err.
It should be easy to see how any model or application that can be run from the command line
and wrapped in a bash script can be called from Swift in this way. |
2.4.2. Utility Functions
As mentioned above, the Swift script also contains two utility app functions.
app (void o) make_dir(string dirname) { (1)
  "mkdir" "-p" dirname;
}

app (void o) run_prerequisites() {  (2)
  "cp" (emews_root+"/complete_model/MessageCenter.log4j.properties") turbine_output;
}| 1 | make_dir simply calls the Unix mkdir command to create a specified directory |
| 2 | run_prerequisites calls the unix cp command to copy a Repast Simphony logging configuration file into
the current working directory. |
Both of these are used by the parameter sweeping part of the script.
2.5. Parameter Sweeping
The remainder of the Swift script performs a simple parameter sweep using the run_model app function to run the model.
The parameters over which we want to sweep are defined in an external file, the so-called unrolled parameter file (UPF),
where each row of the file contains a parameter set for an individual run. The script will read
these parameter sets and launch as many parallel runs as possible for a given process configuration,
passing each run an individual parameter set. The general script flow is as follows:
-
Read the the list of parameters into a
fileobject. -
Split the contents of the file into lines and store each as an array element.
-
Iterate over the array in parallel, launching a model run for each parameter set (i.e., array element) in the array, using the
run_modelapp function.
string emews_root = getenv("EMEWS_PROJECT_ROOT");
string turbine_output = getenv("TURBINE_OUTPUT");

file model_sh = input(emews_root+"/scripts/run_repast_uc1.sh");  (1)
file upf = input(argv("f"));  (2)

main() {
  run_prerequisites() => {  (3)
    string upf_lines[] = file_lines(upf);  (4)
    foreach s,i in upf_lines {  (5)
      string instance = "%s/instance_%i/" % (turbine_output, i+1);
      make_dir(instance) => {  (6)
        file out <instance+"out.txt">;
        file err <instance+"err.txt">;  (7)
        (out,err) = run_model(model_sh, s, instance);  (8)
      }
    }
  }
}| 1 | Initialize a Swift/T file variable with the location of the run_repast_uc1.sh script file. Note that the Swift/T input
function takes a path and returns a file. |
| 2 | The path of the parameter file that contains
the parameter sets that will be passed as input to the Zombies model is defined, also as a file variable.
This line uses
the swift built-in function argv to parse command line arguments to the Swift script.
As indicated earlier, each line of this upf file contains an individual parameter set, that is,
the random_seed, zombie_count, human_count, zombie_step_size and human_step_size
for a single model run. The parameter set is passed as a single string
(e.g., random_seed = 14344, zombie_count = 10, …)
to the Zombies model where it is parsed into the individual parameters. |
| 3 | Script execution begins by calling the run_prerequisites app function.
In the absence of any data flow dependency, Swift statements will execute in parallel whenever possible.
However, in our case, the Repast Simphony logging configuration file must be in place before a Zombie model run begins.
The ⇒ symbol enforces the required sequential execution:
the code on its left-hand side must complete execution before the code on the right-hand side begins execution. |
| 4 | Read the upf file into an array of strings where each line of the file is an element in the array.
The built-in Swift file_lines function (requires import of files module at the top of uc1.swift)
is used to read the upf file into this array of strings. |
| 5 | The foreach loop
executes its loop iterations in parallel. In the foreach loop, the variable s is set to an
array element (that is, a single parameter set represented as a string) while the variable i is the index of that array element. |
| 6 | Create an instance directory into which each model run will write its output. The make_dir app function
is used to create the directory. The ⇒ keyword is again used to ensure that the directory is created before the actual model
run that uses that directory is performed. |
| 7 | Create file objects into which the standard out and standard error streams are redirected by the run_model function. The angle bracket syntax shown here is part of the Swift/T file mapper functionality, which connects string file names to Swift/T file variables in the workflow. More information about this syntax is here. |
| 8 | Lastly the run_model app function that performs the Zombie model run is called with the required arguments. |
This is a common pattern in EMEWS. Some collection of parameters is parsed into an array in which each element is the set of parameters for an individual run. A foreach loop is then used to iterate over the array, launching parallel model runs each with their own parameters. In this way the number of model runs that can be performed in parallel is limited only by hardware resources.
2.6. Results Analysis
In our initial script we have seen how to run multiple instances of the Zombies model in parallel, each with a different set of parameters. Our next example builds on this by adding some post-run analysis that explores the effect of simulated step size on the final number of humans. This analysis will be performed in R and executed within the Swift workflow.
The new script consists of the following steps:
-
Read the the list of a parameters into a
fileobject. -
Split the contents of the file into an array where each line of file is an array element.
-
Iterate over the array in parallel, launching a model run for each parameter set (i.e. array element) in the array, using the repast app function.
-
Get the final human count from each run using R, and add it to an array.
-
Also using R, determine the maximum human counts.
-
Get the parameters that produced those maximum human counts.
-
Write those parameters to a file.
This example assumes an existing parameter file in which zombie_step_size and human_step_size are varied. For each run of the model, that is, for each combination of parameters, the model records a count of each agent type at each time step in an output file. As before the script will iterate through the file performing as many runs as possible in parallel. However, an additional step that reads each output file and determines the parameter combination or combinations that resulted in the most humans surviving at the final time step has been added.
The full updated swift code is in uc1_R.swift.
The updated code includes embedded R code that can be invoked using Swift’s R function:
import R;

string count_humans = ----
last.row <- tail(read.csv("%s/counts.csv"), 1)
res <- last.row["human_count"]
----;

string find_max =  ----
v <- c(%s)
res <- which(v == max(v))
----;
an expanded foreach loop:
string upf_lines[] = file_lines(upf);
string results[];
foreach s,i in upf_lines {
  string instance = "%s/instance_%i/" % (turbine_output, i+1);
  make_dir(instance) => {
    file out <instance+"out.txt">;
    file err <instance+"err.txt">;
    (out,err) = run_model(model_sh, s, instance) => {
      string code = count_humans % instance;
      results[i] = R(code, "toString(res)");
    }
  }
}
and calls to the post processing code:
string results_str = string_join(results, ",");
string code = find_max % results_str;
string maxs = R(code, "toString(res)");
string max_idxs[] = split(maxs, ",");
string best_params[];
foreach s, i in max_idxs {
  int idx = toint(trim(s));
  best_params[i] = upf_lines[idx - 1];
}
file best_out <emews_root + "/output/best_parameters.txt"> =
  write(string_join(best_params, "\n"));
We describe this in two parts. The first describes the changes to the foreach loop to gather the output and the
second describes how that output is analyzed to determine the "best" parameter combination.
2.6.1. Gathering the Results
import R;  (1)

string count_humans = ----  (2)
last.row <- tail(read.csv("%s/counts.csv"), 1)  (3)
res <- last.row["human_count"]  (4)
----;

...

string upf_lines[] = file_lines(upf);
string results[];  (5)
foreach s,i in upf_lines {
  string instance = "%s/instance_%i/" % (turbine_output, i+1);
  make_dir(instance) => {
    file out <instance+"out.txt">;
    file err <instance+"err.txt">;
    (out,err) = run_model(model_sh, s, instance) => {
      string code = count_humans % instance;  (6)
      results[i] = R(code, "toString(res)");  (7)
    }
  }
}| 1 | To use Swift/T’s support for the R language, the R module is imported. |
| 2 | A multiline R script, delineated by ----, is assigned to the count_humans string variable. |
| 3 | The string contains a template character, "%s", which is replaced with the actual directory (described below) in which the output file (counts.csv) is written. The R script reads the CSV file produced by a model run into a data frame. |
| 4 | The last row of the data frame is accessed and the value of the human_count column in that row is
assigned to a res variable. |
| 5 | A results array is initialized. |
| 6 | The run_model call is followed by the execution of the R script. First, the template substitution is performed with the directory for the current run, using the "%" format Swift operator. |
| 7 | R code can be run using Swift’s R function. R takes two arguments, the R code to run,
and an additional R statement that generates the desired return value of the R
code as a string. The return statement is typically, as seen here, something like "toString(res)"
where R’s toString function is passed a variable that contains what
you want to return from the R script. In this case, the res variable contains the number of surviving humans.
This string is then placed in the results array at the ith index. |
2.6.2. Finding the Best Parameters
The final workflow steps are to determine which runs yielded the maximum number of humans and write out the parameters for those runs. The core idea here is that we find the indices of the elements in the results array that contain the maximum human counts and use those indices to retrieve the parameters from the parameters array.
string find_max =  ----
v <- c(%s)  (1)
res <- which(v == max(v))  (2)
----;

...

string results_str = string_join(results, ",");  (3)
string code = find_max % results_str;  (4)
string maxs = R(code, "toString(res)");  (5)
string max_idxs[] = split(maxs, ",");  (6)
string best_params[];
foreach s, i in max_idxs {  (7)
  int idx = toint(trim(s));  (8)
  best_params[i] = upf_lines[idx - 1];  (9)
}
file best_out <emews_root + "/output/best_parameters.txt"> =
write(string_join(best_params, "\n")); (10)| 1 | The R script takes in the results from all of the model runs, as a comma separated string of values, through the "%s" template character (assigned below). |
| 2 | The (1-based) indices of the maximum values are found and stored in the res variable. |
| 3 | Swift’s string_join function (requiring importing the string module) is used to join all the elements of the results array,
i.e., all the final human counts, into a comma separated string. |
| 4 | The comma separated string is assigned to the template character in the find_max R script and assigned to the code string. |
| 5 | As before, Swift’s R function is called with the code string to yield the max indices. |
| 6 | This string is split into a max_idxs array using Swift’s split function.
The split function takes two arguments, the string to split and the string
to split on, and returns an array of strings. |
| 7 | The foreach loop iterates through max_idxs array. |
| 8 | The string representation of each number is converted to an integer. |
| 9 | The corresponding parameter string is retrieved from the upf_lines array, and
is added to the best_params array.
Given that the value in results[i] (from which the max indices are derived) is produced from the parameter combination in
upf_lines[i], the index of the maximum value or values in the max_idxs array is the index of the best parameter combination or combinations.
Note that we subtract one from idx because R indices start at 1 while Swift’s start at 0. |
| 10 | The final step is to write the best parameters to a file using Swift’s write function. |
2.7. Running the Swift Script
Swift scripts are typically launched using a shell script. This allows one to export useful values as environment variables and to properly configure the Swift workflow to be run on HPC resources. The EMEWS Creator will automatically create such a shell script. The shell script for running our simple workflow can be see in run_uc1.sh.
if [ "$#" -ne 2 ]; then  (1)
  script_name=$(basename $0)
  echo "Usage: ${script_name} exp_id cfg_file"
  exit 1
fi

# Uncomment to turn on swift/t logging. Can also set TURBINE_LOG,
# TURBINE_DEBUG, and ADLB_DEBUG to 0 to turn off logging
# export TURBINE_LOG=1 TURBINE_DEBUG=1 ADLB_DEBUG=1  (2)
export EMEWS_PROJECT_ROOT=$( cd $( dirname $0 )/.. ; /bin/pwd )  (3)

...

export EXPID=$1
export TURBINE_OUTPUT=$EMEWS_PROJECT_ROOT/experiments/$EXPID  (4)
check_directory_exists

CFG_FILE=$2
source $CFG_FILE  (5)

echo "--------------------------"
echo "WALLTIME:              $CFG_WALLTIME"
echo "PROCS:                 $CFG_PROCS"
echo "PPN:                   $CFG_PPN"
echo "QUEUE:                 $CFG_QUEUE"
echo "PROJECT:               $CFG_PROJECT"
echo "UPF FILE:              $CFG_UPF"
echo "--------------------------"

export PROCS=$CFG_PROCS
export QUEUE=$CFG_QUEUE
export PROJECT=$CFG_PROJECT
export WALLTIME=$CFG_WALLTIME
export PPN=$CFG_PPN
...
# Copies UPF file to experiment directory
U_UPF_FILE=$EMEWS_PROJECT_ROOT/$CFG_UPF
UPF_FILE=$TURBINE_OUTPUT/upf.txt
cp $U_UPF_FILE $UPF_FILE  (6)

CMD_LINE_ARGS="$* -f=$UPF_FILE "  (7)
...

SWIFT_FILE=uc1.swift  (8)
swift-t -n $PROCS $MACHINE -p \  (9)
    -I $EMEWS_EXT -r $EMEWS_EXT \
    -e TURBINE_MPI_THREAD \
    -e TURBINE_OUTPUT \
    -e EMEWS_PROJECT_ROOT \
    $EMEWS_PROJECT_ROOT/swift/$SWIFT_FILE \
$CMD_LINE_ARGS| 1 | run_uc1.sh takes 2 required arguments (exp_id and cfg_file). The first is an experiment id (e.g., "experiment_1"), which is used to define a directory (TURBINE_OUTPUT, defined below) into which per workflow output can be written. Swift will also write its own log files into this directory as the workflow executes. The second required argument is the workflow configuration file. EMEWS Creator will have auto-generated a configuration file based on the information provided to it, and can be seen in uc1.cfg. |
| 2 | Additional logging, including debugging logs, can be enabled by uncommenting. |
| 3 | EMEWS_PROJECT_ROOT is defined and exported here. The workflow launch script assumes the canonical EMEWS directory structure, where
the so-called EMEWS project root directory contains other directories
such as a swift directory in which the swift scripts are
located. |
| 4 | The TURBINE_OUTPUT directory is defined, using the EMEWS_PROJECT_ROOT and EXPID environment variables. |
| 5 | The configuration file is sourced, bringing in the specific CFG_X environment variables defined there.
These include environment variables that are required for
cluster execution such as queue name (QUEUE), project name (PROJECT), requested walltime (WALLTIME),
processes per node (PPN), and so forth. Any additional environment variables can be included here
and optionally also provided through the configuration file mechanism. |
| 6 | The utilized unrolled parameter file is copied to the TURBINE_OUTPUT directory to document the details of the workflow and also to prevent any inadvertent overwriting between script submission and the job run. |
| 7 | The command line arguments provided to the Swift script are constructed. Here the "-f=" argument points to the unrolled parameter file. |
| 8 | We specify that we want to run uc1.swift for the simpler workflow, or we could indicate uc1_R.swift for the version that includes the post-run analysis to find the optimal parameters. |
| 9 | The final lines run the swift script by
calling swift-t with Swift specific, e.g., "-n" specifies the total number of processes on which to run,
and script specific arguments, here the CMD_LINE_ARGS defined above.
Additional help for the arguments to swift-t can be seen by running
swift-t -h. More information on the shell script used to
launch the Swift/T workflow can be seen in the Sweep Template section. |
2.8. Downloading and running the full UC1 example
To run the UC1 example, you can navigate to the EMEWS Tutorial Code site, and follow the instructions to clone the repository and download the Zombies model.
From the root of the cloned repository, run the following shell commands:
$ cd uc1/swift  (1)
$ ./run_uc1.sh exp1 cfgs/uc1.cfg (2)| 1 | Change directory into the swift subdirectory of the uc1 directory. |
| 2 | This runs the workflow through the run_uc1.sh file, providing two arguments. The first is an experiment ID (in this case exp1), and the second is a path to the uc1.cfg configuration file, which is inside the cfgs directory. |
Once the workflow completes, you will see 50 instance directories (corresponding to the 50 lines in the UPF file) along with the following ouputs in the experiments/exp1 directory:
exp1
├── MessageCenter.log4j.properties  (1)
├── cfg.cfg  (2)
├── instance_1  (3)
│   ├── counts.batch_param_map.csv
│   ├── counts.csv  (4)
│   ├── data -> /Users/jozik/repos/emews-tutorial-code/uc1/complete_model/data  (5)
│   ├── debug.log  (6)
│   ├── err.txt  (7)
│   ├── location_output.batch_param_map.csv
│   ├── location_output.csv  (8)
│   └── out.txt  (9)
├── instance_10
|   ...
├── instance_11
|   ...
...
├── instance_9
│   ...
├── run_uc1.sh.log  (10)
└── upf.txt (11)| 1 | This is a logging configuration file used by Repast Simphony. |
| 2 | The EMEWS configuration file that was used to launch the workflow is preserved here for reference. |
| 3 | This is 1 of 50 instance directories, corresponding to the 50 lines in the UPF file. |
| 4 | A csv file containing that counts of Human and Zombie agents over time, where the corresponding counts.batch_param_map.csv file contains the parameter values used for this instance. |
| 5 | A symlink to the data folder inside the Zombies model. This is an empty folder for this example, but could include input or reference data needed for the model to run, and this prevents unnecessary duplication of those assets. |
| 6 | Repast Simphony uses this to log any debugging information. Outputs are configured by the MessageCenter.log4j.properties file. |
| 7 | Standard error logged by the Repast Simphony App Function, which launches each Zombies instance. |
| 8 | A csv file containing the locations of Human and Zombie agents at each time step. Here too, Repast Simphony produces the corresponding x.batch_param_map.csv file to track the parameter values used for this instance. |
| 9 | Standard out logged by the Repast Simphony App Function, which launches each Zombies instance. |
| 10 | A concretized version of the run_uc1.sh file used to launch the workflow, including the resolved environment variables used. |
| 11 | The UPF file used to launch this workflow, preserved here for reference. |
3. Workflow control with Python
Due to the highly non-linear relationship between ABM input parameters and model outputs, as well as feedback loops and emergent behaviors, large-parameter spaces of realistic ABMs cannot generally be explored via brute force methods, such as full-factorial experiments, space-filling sampling techniques, or any other a priori determined sampling schemes. This is where adaptive, heuristics-based approaches for model exploration (ME) are useful and this is the focus of the next two use cases.
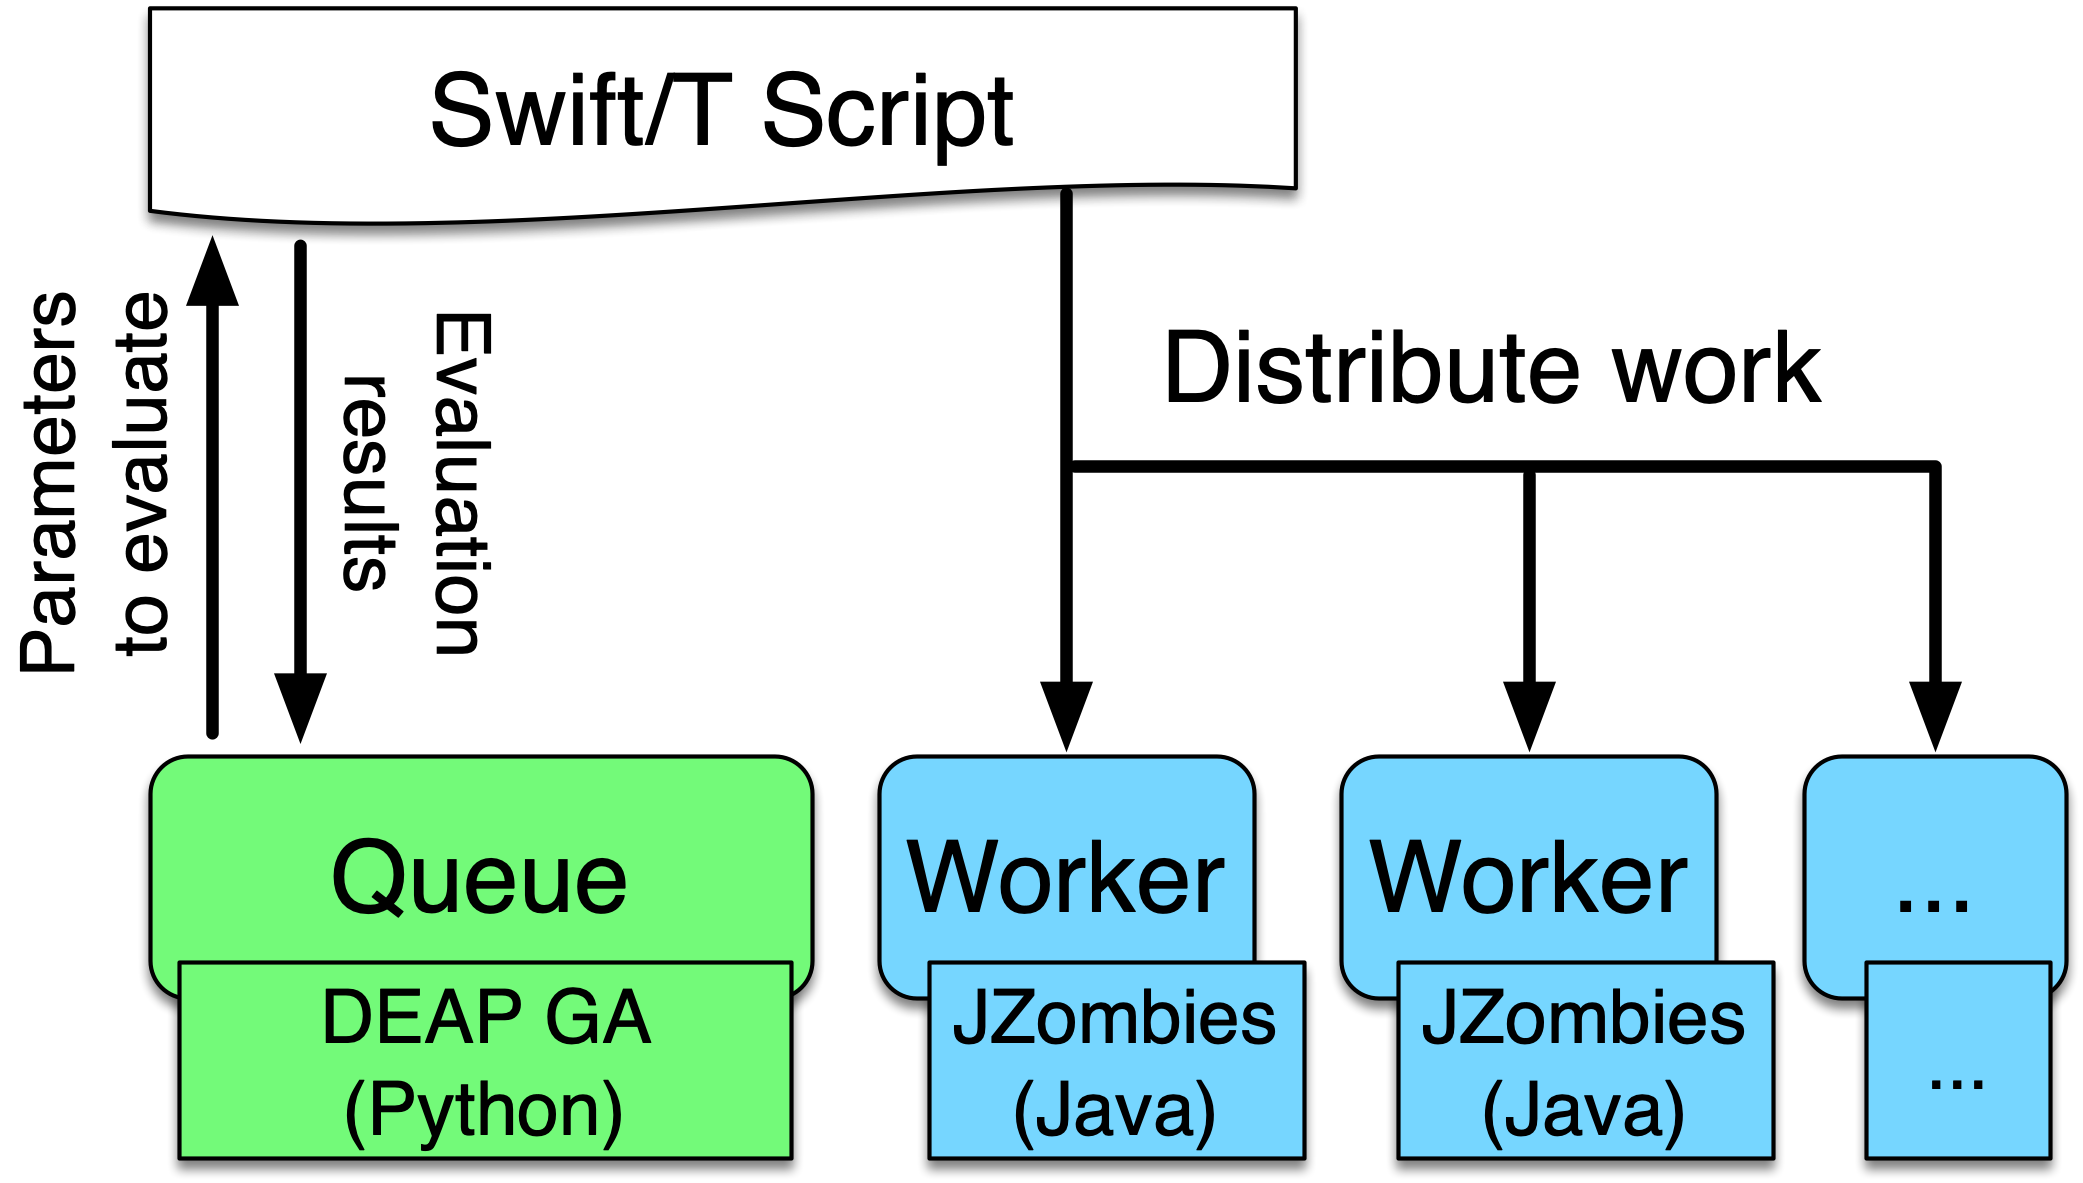
In (Ozik, Collier, and Wozniak 2015) we describe an inversion of control (IoC) approach enabled by resident Python tasks in Swift/T and simple queue-based interfaces for passing parameters and simulation results, where a metaheuristic method, a genetic algorithm (GA), is used to control a large workflow. This workflow structure was made more general and resulted in the EMEWS framework. In this second use case we describe how this IoC workflow is implemented with the EQ/Py extension. The following is the overall EMEWS workflow structure for this use case.
|
This use case assumes that you have already installed EMEWS. See the Quickstart section for how to do this with a simple binary install on your local setup. For non-binary installations or for installing on HPC resources, see the EMEWS Install section. A Python (and optionally R) enabled Swift/T installation will be required. |
| Completion of the new Workflow control with Python use case is in progress. |
4. Workflows with a Distributed MPI-based Model
In this use case, we will show how to integrate a multi-process distributed native code model written in C into a Swift/T workflow. The model is a variant of the Java Zombies model, written in C and using MPI and the Repast HPC toolkit (Collier and North 2013) to distribute the model across multiple processes. The complete two dimensional continuous space and grid span processes and each individual process holds some subsection of the continuous space and grid. The Zombies and Humans behave as in the other tutorials but may cross process boundaries into another subsection of the continuous space and grid as they move about the complete space. The model itself is driven by an active learning (Settles 2012) algorithm using EQ/R. As is discussed in the EMEWS Creator EQ/R section, the EQ/R extension provides an interface for interacting with R-based code run in a resident tasks at specific locations. The code that we present in this use case is directly adapted from the EQ/R template.
|
This use case assumes that you have already installed EMEWS. See the Quickstart section for how to do this with a simple binary install on your local setup. For non-binary installations or for installing on HPC resources, see the EMEWS Install section. An R and Python-enabled Swift/T installation will be required. |
| Completion of the new Workflows with a Distributed MPI-based Model use case is in progress. |
5. Minimizing the Ackley function with an EQSQL Workflow
Our 4th use case workflow implements an example EQSQL optimization workflow that attempts to find the minimum of the Ackley function using a Gaussian process regression model (GPR). Our implementation, is based on a similar example problem provided as part of the Colmena documentation. We begin with a sample set containing a number of randomly generated n-dimensional points. Each of these points is submitted as a task to the Ackley function for evaluation. When a specified number of tasks have completed (i.e., that number of Ackley function evaluation results are available), we train a GPR using the results, and reorder the evaluation of the remaining tasks, increasing the priority of those more likely to find an optimal result according to the GPR. This repeats until all the evaluations complete.
This tutorial uses the project structure and files created from the emews creator eqsql template, and that should be read before this.
|
This use case assumes that you have already installed EMEWS. See the Quickstart section for how to do this with a simple binary install on your local setup. For non-binary installations or for installing on HPC resources, see the EMEWS Install section. A Python (and optionally R) enabled Swift/T installation will be required. |
5.1. Tutorial Goals
-
Run an EQSQL Workflow in Swift/T
-
Implement a Python ME that produces tasks (parameters) for parallel evaluation
-
Implement the parallel evalution of those tasks in a SWift/T worker pool
5.2. Running the Workflow
The workflow can be run using the uc4/python/me.py python script. It takes two arguments:
-
An experiment id, e.g. "test_ackley".
-
The path to the ME configuration file, i.e.,
uc4/python/me_cfg.yaml
For example,
$ cd uc4/python
$ python3 me.py test_ackley me_cfg.yaml
Running the workflow will create an experiment directory whose name consists of th experiment id followed by a timestamp. The workflow runs within this directory.
5.3. Workflow Project Structure
The full source code for this use case can be accessed here. The completed workflow project has the following directory structure and files:
uc4/
├── data
├── etc
│   └── emews_utils.sh
├── ext
│   ├── emews
│   │   └── emews.swift
│   └── EQ-SQL
│       ├── EQSQL.swift
│       └── eqsql_swift.py
├── python
│   ├── ackley.py
│   ├── me_cfg.yaml
│   ├── me.py
│   └── test
├── R
│   └── test
├── README.md
├── scripts
│   └── run_ackley.sh
└── swift
    ├── ackley_worker_pool.swift
    ├── cfgs
    │   └── ackley_worker_pool.cfg
    └── run_ackley_worker_pool.sh
The initial version of this project was created using EMEWS Creator with the following command:
emewscreator -o uc4 eqsql -c tutorial_cfgs/UC4.yamlSee the eqsql section in the emews creator documentation for additional information on the general project structure.
As an eqsql project, the ME algorithm in the UC4 example submits tasks to a database. Those tasks are retrieved and executed by a worker pool, which then submits the results back where they can be used by the ME. Here, the ME produces inputs to the Ackley function submitting those as tasks to the database. The worker pool evaluates those inputs in parallel by executing the Ackley function on them, and pushes the results back to the database. Periodically, the ME uses a GPR model to re-prioritize the unevaluated remaining inputs, assigning a higher priority to those it deems more likely to produce a minimum. The following files implement this workflow.
-
python/me.py- the Python ME that submits the Ackley inputs and re-prioritizes them -
python/me_cfg.yaml- the configuration file for the ME -
swift/ackley_worker_pool.swift- the worker pool that retrieves the inputs for evaluation by the Ackley function -
swift/run_ackley_worker_pool.sh- a bash script used to launch the worker pool -
swift/cfgs/ackley_worker_pool.cfg- the configuration file for the worker pool -
scripts/run_ackley.sh- a bash script called by the worker pool to run the Python Ackley function -
python/ackley.py- the Ackley function implemented in Python and called by therun_ackley.shbash script
5.4. The Ackley Function
The Ackley function is widely used for testing optimization algorithms.
In our example project, it is implemented in uc4/python/ackley.py
|
We have added a lognormally distributed sleep delay to the Ackley function implementation to increase the otherwise millisecond runtime and to add task runtime heterogeneity for demonstration purposes. |
5.5. Calling the Ackley Function from Swift
The Ackley function is implemented in Python and is called by the swift worker pool
using a bash script uc4/scripts/run_ackley.sh
The run_ackley.sh script takes 5 inputs, which are passed from the worker pool swift code when
the script is called.
 Set PARAM_LINE from the first argument to this script
# PARAM_LINE is the string containing the model parameters for a run.
PARAM_LINE=$1

# Set the name of the file to write model output to.
OUTPUT_FILE=$2

# Set the TRIAL_ID - this can be used to pass a random seed (for example)
# to the model
TRIAL_ID=$3

# Set EMEWS_ROOT to the root directory of the project (i.e. the directory
# that contains the scripts, swift, etc. directories and files)
EMEWS_ROOT=$4

# Each model run, runs in its own "instance" directory
# Set INSTANCE_DIRECTORY to that.
INSTANCE_DIRECTORY=$5|
The |
After cd-ing to the INSTANCE_DIRECTORY, the script runs the Ackley function Python code using these inputs.
cd $INSTANCE_DIRECTORY

# TODO: Define the command to run the model.
MODEL_CMD="$HOME/anaconda3/envs/swift-t-r-py3.9/bin/python3"    (1)
# TODO: Define the arguments to the MODEL_CMD. Each argument should be
# surrounded by quotes and separated by spaces.
arg_array=( "$EMEWS_ROOT/python/ackley.py"    (2)
            "$PARAM_LINE"
            "$OUTPUT_FILE")

$TIMEOUT_CMD "$MODEL_CMD" "${arg_array[@]}" (3)| 1 | Set the Python interpreter to use for running the Ackley Python code. |
| 2 | Set the Ackley python implementation file, the input parameters, and the file to write the Ackley function output to as arguments to the Python command. |
| 3 | Execute the Python command with the provided arguments. |
|
The |
|
We typically use JSON formatted strings to describe model input parameters. The ME will push JSON formatted dictionaries to the database, and those strings are retrieved by the worker pool, passed to the bash script, and from there to the model execution itself. |
When the run_ackley.sh scripts calls python/ackley.py to execute the
Ackley function on the provided input, the main section of ackley.py is executed. The main section receives the Ackley function input (the $PARAM_LINE variable in
run_ackley.sh), and the path to the output file as command line arguments. It unpacks
these arguments, calls the run function, and writes the result to the output file.
if __name__ == '__main__':
    # param_line, output_file
    param_str = sys.argv[1]    (1)
    output_file = sys.argv[2]

    y = run(param_str)    (2)
    with open(output_file, 'w') as fout:    (3)
fout.write(f'{y}')| 1 | Unpack the command line arguments. |
| 2 | Call the run function, passing the Ackley function input. |
| 3 | Write the Ackley function result to the output file. |
run unpacks the Ackley function parameters and calls the Ackley function itself.
def run(param_str: str) -> str:
    """Run the Ackley function on the specified JSON
    payload.
    """
    args = json.loads(param_str)    (1)
    x = np.array(args['x'])    (2)

    result = ackley(x)    (3)
return json.dumps(result) (4)| 1 | Load the parameter string in to a dictionary. The parameter string is formatted as a JSON map where each entry in the map is an input variable. |
| 2 | Convert the parameter x entry into a numpy array. x is a JSON list in the
parameter string and needs to be converted to an array for the Ackley function. |
| 3 | Run the Ackley function. |
| 4 | Return the Ackley function result as a JSON string. |
The swift worker pool script is largely unchanged from what is created by the
eqsql emews creator template which is described here. We have,
however, edited the get_result function to return the result of an
Ackley evaluation.
(float result) get_result(string output_file) {
    // Read the output file to get result
    file of = input(output_file);    (1)
    result = string2float(read(of));    (2)
}| 1 | Initialize the output file as a swift-t file object. output_file is the path
passed to ackley.py as a command line argument. The Ackley function result is
written to this file in python/ackley.py |
| 2 | Read the first line of that file, which contains the result, and convert the string to a float. |
The worker pool configuration file (swift/cfgs/ackley_worker_pool.cfg) and the worker pool launch script
(swift/run_ackley_worker_pool.sh)
are unchanged from those produced by eqsql template. A discussion of them can be found here
and here
5.5.1. Alternatives to a Bash Script
Python and R code can also be executed directly using Swift-T’s embedded Python and R interpreters. When calling Python or R code directly from Swift, the convention is to provide the code to call in a text string with template arguments for the variables that will be passed to the Python and R code. For example, calling the Ackley function Python code from within Swift might look like:
string ackley_code_template =    (1)
"""
import ackley

param_str = '%s'    (2)
result = ackley.run(param_str)    (3)
"""| 1 | Embed the Python code to be called in a string |
| 2 | Use a formatting token for the parameters to pass to the Ackley function |
| 3 | Call the Ackley function code, putting the result in the result` variable |
To run the code in this string, it is first formatted then executed by the embedded interpreter.
string code = ackley_code_template % (task_payload);    (1)
string result = python_persist(code, "result"); (2)| 1 | Replace the %s` in the ackley_code_template string with the task payload |
| 2 | Execute resulting string (i.e., code) in the Python interpreter, returning the value of the
named result variable. |
See Swift-T External Scripting for more details on using the embedded Python and R interpreters.
The primary advantage of using the embedded interpreters are being able retrieve the results without writing to a file and then reading that file, and so streamlining the code and avoiding file I/O. The disadvantage is that only the interpreters that are compiled into SWift can be used. HPC resources often provide a variety of Pythons for different tasks and hardware. When running from a bash script, the script can select the most appropriate Python (or R) for the task, rather than being constrained to a single one.
| In addition to running a model, the embeded Python interpreter can be very useful for manipulating parameter strings removing, adding or transforming parameters. |
5.6. The Ackley ME
The Ackley workflow can be run by executing the Python script python/me.py
The code begins by
starting the EQ/SQL database, the worker pool, and initializing a task queue through which tasks can be sent to the worker pool via the database. The code then submits a user specified amount of initial tasks to the database, and waits
for a prespecified number of tasks to complete. When that number has completed, the remaining unexecuted tasks are reprioritized
using a GPR model. This continues until some total number have been completed. The intention is to illustrate a typical
ME workflow where tasks are submitted to a task queue, and the ME waits for some to complete, at which point it can submit new tasks based on the existing results and reprioritize unexecuted tasks if necessary.
The code consists of a Python dataclass for encapsulating a task, 5 functions, and a main block. The create_parser, and
main block are discussed in the emews creator eqsql section and won’t be discussed here.
Similarily, creating the task queue, and starting the database, and worker pool which are performed in the run function were also discussed
in the emews creator eqsql section and will not be covered here.
After initialization, the run function calls submit_initial_tasks, passing it the created task_queue,
the user provided experiment id, and the ME input parameters as a dictionary. The random samples
used as Ackley function input data are created and submitted as tasks for evaluation.
def submit_initial_tasks(task_queue, exp_id: str, params: Dict) -> Dict[int, Task]:
    ...
    search_space_size = params['search_space_size']    (1)
    dim = params['sample_dimensions']    (2)
    sampled_space = np.random.uniform(size=(search_space_size, dim),    (3)
                                      low=-32.768, high=32.768)

    task_type = params['task_type']    (4)

    payloads = []
    for sample in sampled_space:    (5)
        payload = json.dumps({'x': list(sample)})
        payloads.append(payload)
    _, fts = task_queue.submit_tasks(exp_id, eq_type=task_type, payload=payloads)    (6)

    tasks = {ft.eq_task_id: Task(future=ft, sample=sampled_space[i], result=None)    (7)
             for i, ft in enumerate(fts)}

return tasks| 1 | Get the search space size, i.e., the number of initial samples to evaluate. |
| 2 | Get the number of dimensions in each sample. |
| 3 | Create a numpy 2D array of search_space_size where each row is an array of dim size
containing random numbers between -32.768 and 32.768. |
| 4 | Get the task type id to be used in task submission. A worker pool will query for tasks of a specific type, and this identifies that type. |
| 5 | For each sample in the sampled space, create a JSON map with a single key, x,
whose value is the sample array. Add that JSON string to a list of payloads
to submit to the database queue. |
| 6 | Submit the list of payloads as tasks to be executed, passing the experiment id, and
task type. The submission returns a status, which we assume to be successful and ignore,
and a list of eqsql.eq.Future objects. |
| 7 | Create and return a Python dictionary of Task dataclass objects. Each Task contains
the Future for that tasks, the numpy array that was submitted as that task’s input,
and a result (which is initially None, indicating that the task has not yet been evaluated). |
|
Numpy structures such as arrays are not directly JSON-ifiable, and so we need to convert them into Python structures that are, such as lists. |
Having submitted the initial tasks, run begins the optimization loop. The loop repeatedly queries for
some number of completed tasks using a task queues' as_completed method which returns
an iterator over that number of completed tasks, waiting for tasks to complete if necessary.
When as_completed finishes returning completed tasks, we reprioritize the remaining
uncompleted tasks using the results provided by the completed tasks. The loop continues
calling as_completed and reprioritizing until the total number of tasks have completed.
tasks = submit_initial_tasks(task_queue, exp_id, params)
total_completed = params['total_completed']    (1)
tasks_completed = 0
reprioritize_after = params['reprioritize_after']    (2)
# list of futures for the submitted tasks
fts = [t.future for t in tasks.values()]    (3)

while tasks_completed < total_completed:    (4)
    # add the result to the completed Tasks.
    for ft in task_queue.as_completed(fts, pop=True, n=reprioritize_after):    (5)
        _, result = ft.result()    (6)
        tasks[ft.eq_task_id].result = json.loads(result)    (7)
        tasks_completed += 1    (8)

reprioritize(tasks) (9)| 1 | Get the total number of tasks to complete (i.e., the total number of Ackley function evaluations to perform) before stopping. |
| 2 | Get the number of tasks to complete before reprioritizing. |
| 3 | Create a list containing all the Task futures. Most of the eqsql functions that return some number of completed tasks, or tasks as they complete, use a list of Futures as an argument, so we create that here. |
| 4 | While the number of completed tasks is less than the total number to complete,
wait for another reprioritize_after number of tasks to complete, and then reprioritize. |
| 5 | Iterate through reprioritize_after number of completed Futures. Those futures
are popped off the fts list of futures. |
| 6 | Get the result of a completed Future. |
| 7 | JSON-ify that result and set the result attribute of the Task associated with that Future. |
| 8 | Increment the number of total completed tasks. |
| 9 | After another reprioritize_after number of tasks have completed, and their results
assigned to the corresponding Task object, reprioritize the uncompleted tasks. |
The reprioritize function uses the completed task results
captured in the result attribute of the Tasks objects to reprioritize the remaining tasks. It begins by separating
the Task objects into training and prediction data sets.
def reprioritize(tasks: Dict[int, Task]):
    training = []
    uncompleted_fts = []
    prediction = []
    for t in tasks.values():    (1)
        if t.result is None:    (2)
            uncompleted_fts.append(t.future)
            prediction.append(t.sample)
        else:
training.append([t.sample, t.result]) (3)| 1 | Iterate through all the Tasks, separating them into test and prediction data sets. |
| 2 | If the Task’s result is None (i.e., it hasn’t completed) then add its sample input to the prediction data set, and it’s future to the list of uncompleted futures. |
| 3 | Add the completed Task’s sample input and result values to the training data. |
With the training and prediction data created, reprioritize fits the GPR
using the training data and ranks the uncompleted tasks by likelihood
of minimizing the Ackley function. Using that ranking, it then reprioritizes the remaining
uncompleted tasks.
fts = []
priorities = []
max_priority = len(uncompleted_fts)    (1)
ranking = fit_gpr(training, prediction)    (2)
for i, idx in enumerate(ranking):    (3)
    ft = uncompleted_fts[idx]
    priority = max_priority - i    (4)
    fts.append(ft)
    priorities.append(priority)

print("Reprioritizing ...", flush=True)
eq.update_priority(fts, priorities) (5)| 1 | Set the maximum priority to the number of uncompleted tasks. |
| 2 | Call the GPR to get the Task ranking. The returned ranking is a ranked list of indices into the prediction data. |
| 3 | For each index in the ranking, get the Future corresponding to that index, assign a priority, and add the Future and the priority to their respective lists. |
| 4 | Compute a priority by subtracting the current iteration index from the max priority. |
| 5 | Update the priorities of the specified futures to the priorities in the specified list. |
The ME itself is configured using a yaml format configuration file,
python/me_cfg.yaml. The ME
code reads in this file, and creates a params Python dictionary from it. In addition to
those entries described in the emews creator eqsql template section, the file contains
the following entries:
search_space_size: 50    (1)
sample_dimensions: 4    (2)
total_completed: 40    (3)
reprioritize_after: 10 (4)| 1 | The size of the sample search space. This many samples are created and submitted as tasks for Ackley function evaluation by the worker pool. |
| 2 | The number of dimensions in each sample. |
| 3 | The total number of Ackley function evaluations to complete before stopping. |
| 4 | The number of tasks to complete before reprioritizing. Each time this number of additional Ackley function evaluations have completed, reprioritize the remaining uncompleted tasks. |
Appendix A: Installing EMEWS
EMEWS supports two installation modes, Binary and Source, described in the following subsections:
A.1. Binary
Binary installations are recommended for this tutorial and small scale testing on supported systems. The binary installation is implemented as a conda environment that contains all the necessary EMEWS components including Swift/T, R, Python, PostgreSQL, and the R and Python packages.
The binary install is a conda environment, and requires a conda installation as a prerequisite. Please install miniforge, anaconda, or miniconda if you do not have an existing conda installation. For the differences between the three with respect to Anaconda’s Terms of Service and remaining in compliance with those terms, see is conda free. More information on conda environments can found here.
See [_quickstart] for how to download the install scripts and install the environment with the install_emews.sh script. The remainder
of this section will walk through the relevant parts of the script in greater detail.
A.1.1. The Install Script
After performing some initial error checking and variable definition, the install script performs the install steps, beginning with creating the conda environment.
ENV_NAME=emews-py${PY_VERSION}    (1)
TEXT="Creating conda environment '${ENV_NAME}' using Python ${PY_VERSION}"  (2)
start_step "$TEXT"  (3)
# echo "Creating conda environment '${ENV_NAME}' using ${PY_VERSION}"
conda create -y -n $ENV_NAME python=${PY_VERSION} > "$EMEWS_INSTALL_LOG" 2>&1 || on_error "$TEXT" "$EMEWS_INSTALL_LOG"  (4)
end_step "$TEXT" (5)| 1 | Format the name of the environment using the python version passed on the command line. |
| 2 | Format the text used in the script output for this step in the script execution |
| 3 | Display the formatted step text with an unchecked text box. |
| 4 | Create the named conda environment redirecting the output to the install log, and terminating the script on error. |
| 5 | Display the formatted step text with a checked text box indicating that this step has completed. |
The next step in the script is to the swift-t-r conda package which installs Swift/T and
all its dependencies including a custom R installation. The step text formatting
and display works the same as above, and so is not explained further.
TEXT="Installing swift-t conda package"
start_step "$TEXT"
source $CONDA_BIN_DIR/activate $ENV_NAME  (1)
conda install -y -c conda-forge -c swift-t swift-t-r >> "$EMEWS_INSTALL_LOG" 2>&1 || on_error "$TEXT" "$EMEWS_INSTALL_LOG"  (2)
conda deactivate  (3)
source $CONDA_BIN_DIR/activate $ENV_NAME  (4)
end_step "$TEXT"| 1 | Activate the conda environment created in the first step, in order to install the packages into it. |
| 2 | Install the swift-t-r conda package. |
| 3 | Deactivate the environment. |
| 4 | Activate the environment again to trigger any environment activation scripts installed
by the swift-t-r package. |
The next step installs the EMEWS Queues for R (EQ/R) Swift-t extension. EQ/R allows a user to easily use R model exploration code to guide workflow execution.
TEXT="Installing EMEWS Queues for R"
start_step "$TEXT"
conda install -y -c conda-forge -c swift-t eq-r >> "$EMEWS_INSTALL_LOG" 2>&1 || on_error "$TEXT" "$EMEWS_INSTALL_LOG"
end_step "$TEXT"
The next step installs the PostgreSQL database software from a conda package.
TEXT="Installing PostgreSQL"
start_step "$TEXT"
conda install -y -c conda-forge postgresql >> "$EMEWS_INSTALL_LOG" 2>&1 || on_error "$TEXT" "$EMEWS_INSTALL_LOG"
end_step "$TEXT"
The EMEWS Creator Python package is then installed. This also installs the eqsql Python package as a dependency.
TEXT="Installing EMEWS Creator"
start_step "$TEXT"
pip install emewscreator >> "$EMEWS_INSTALL_LOG" 2>&1 || on_error "$TEXT" "$EMEWS_INSTALL_LOG"
end_step "$TEXT"
EMEWS Creator is then used to initialize the EMEWS DB database in the
database directory location (i.e., $2) that was passed in the command line.
See Section B.5, “INIT DB” for more information for more details about the database installation,
and Creating EMEWS Projects for more on EMEWS Creator.
TEXT="Initializing EMEWS Database"
emewscreator init_db -d $2 >> "$EMEWS_INSTALL_LOG" 2>&1 || on_error "$TEXT" "$EMEWS_INSTALL_LOG"
end_step "$TEXT"
Lastly, the install script installs the R packages required when using EMEWS DB with R.
TEXT="Initializing Required R Packages"
Rscript $THIS/install_pkgs.R >> "$EMEWS_INSTALL_LOG" 2>&1 || on_error "$TEXT" "$EMEWS_INSTALL_LOG"  (1)
Rscript -e "remotes::install_github('emews/EQ-SQL/R/EQ.SQL')" >> "$EMEWS_INSTALL_LOG" 2>&1 || on_error "$TEXT" "$EMEWS_INSTALL_LOG"  (2)
end_step "$TEXT"| 1 | Use the R installed as part of the swift-t-r package to execute the install_pkgs.R script. This
script installs the required R packages from the CRAN repository, and tests that they can be loaded successfully. |
| 2 | Install the EMEWS DB EQ.SQL R package from github. |
A.2. Source
A.2.1. Motivation
If you cannot use the install_emews.sh script described above, is generally easiest and most reliable to install packages from your system package manager such as Homebrew, APT, or RPM. On some systems (such as compute clusters and supercomputers), however, you must build from source to access the site-specific MPI implementation used for communication inside the Swift/T workflow. You may also desire to use specific versions of Python or R to support your applications. Thus, it is possible to mix and match the EMEWS installation with binary and source installations of its dependencies.
A.2.2. List of supported platforms
Source installations are supported for:
-
Linux on x86 (
linux-64) -
Linux on ARM64 (
linux-aarch64) -
macOS on x86 (
osx-64) -
macOS on ARM64 (
osx-arm64) -
Windows WSL (any distribution)
A.2.3. Source installation procedure
The source installation procedure is a more manual way to perform the same operations that are found in the install_emews.sh script.
To build from source, you will need the following packages (with their APT names):
SWIG (swig), ZSH (zsh), Apache Ant (ant),
a Java Development Kit (default-jdk) >= 1.6, Make (make),
GCC for C (gcc), Python (python3-dev), R (r-base-dev), Tcl (tcl-dev),
and an MPI implementation (e.g., mpich).
EMEWS supports any compiler toolset and MPI implementation. The Swift/T runtime is used to link together many of the workflow components for EMEWS, but not the database. It is important to maintain consistency with the C compiler across all the tools linked together under Swift/T, which is automatically done under a package manager. A primary purpose of package managers is to maintain compiler/binary compatibility across packages. If you install some of these tools from the package manager, and manually compile some with the compiler under the same package manager, you will be fine.
A complete description of the Swift/T installation may be found at the Swift/T Guide.
You must also install Postgres, but this does not have to be linked to Swift/T. The instructions for this are under the Postgres Server Administration Docs.
Then install EMEWS Creator with:
$ pip install emewscreator
Then, install necessary R libraries with:
$ Rscript code/install/install_pkgs.R
or build them manually.
When you run EMEWS Creator, you will need to refer to the tools installed here (R and Tcl) during EQ/R build process.
6. Troubleshooting
6.1. Problems with R
6.1.1. Compile-time problems with R
If R packages fail to install, check your environment:
-
Ensure no unnecessary environment variables are set: https://stat.ethz.ch/R-manual/R-devel/library/base/html/EnvVar.html, particularly R_LIBS_USER.
-
Inside R, use Sys.getenv() and .libPaths() to make sure no custom user libraries are affecting R.
-
If you have R libraries installed on your system, you can force R to ignore them by setting this environment variable in your shell:
$ export R_LIBS_USER=x
This sets R_LIBS_USER to a non-existent location, thus ignoring it.
-
Check your R build configuration files, ~/R/Makevars and ~/.Renviron . These should be empty for EMEWS, however, you can re-add any needed features after you get EMEWS working.
Appendix B: Creating EMEWS Projects
EMEWS Creator is a Python application for creating workflow projects for EMEWS from the command line. The project consists of the canonical EMEWS directory layout and various files that can be customized by the user for their particular use case.
B.1. Installation
If you have already installed EMEWS through the Quickstart section, EMEWS Creator is already installed.
EMEWS Creator can also be downloaded and installed from PyPI using pip.
pip install emewscreator
B.2. Using EMEWS Creator
Once installed EMEWS Creator is run from the command line. It has the following options.
$ emewscreator -h
Usage: emewscreator [OPTIONS] COMMAND [ARGS]...

Options:
  -V, --version          Show the version and exit.
  -o, --output-dir PATH  Directory into which the project template will be
                         generated. Defaults to the current directory

  -m, --model-name TEXT  Name of the model application. Defaults to "model".
  -w, --overwrite        Overwrite existing files
  -h, --help             Show this message and exit.

Commands:
  eqpy   create an eqpy workflow
  eqr    create an eqr workflow
  eqsql    create an eqsql workflow
  init_db  initialize an eqsql database
  sweep  create a sweep workflow
Each of the commands creates a particular type of workflow: a sweep, an eqpy-based workflow, an eqr-based workflow, on an eqsql-based workflow. Each of the commands has its own arguments specific to that workflow type. These are specified on the command line after the COMMAND argument, and will be covered in the Workflow Templates section below.
The following options supplied to emewscreator are common to all the workflow types:
-
--output-dir- the root directory of the directory structure and files created by EMEWS Creator. -
--model-name- the name of the model that will be run during the workflow. This will be used in the model execution bash script. Note that spaces will be replaced by underscores. -
--overwrite- if present, EMEWS Creator will overwrite any existing files in theoutput-dirdirectory when creating the workflow. By default, existing files will not be overwritten.
These values can also be supplied in a yaml format configuration file. Sample
configuration files can be found here
in the example_cfgs directory in the EMEWS Creator github repository.
B.3. EMEWS Project Structure
Each of the workflow types will create the default EMEWS project structure
in the directory specified by the -o, --output-dir argument.
EMEWS Creator is designed such that multiple workflows can be run in the same directory.
For example, you can begin with the sweep and then create an eqr or eqpy
workflow in the same output directory. When multiple workflows are created
in the same output directory, it is crucial that the workflow_name
configuration template argument is unique to each individual workflow. See
the Workflow Templates section for more information on the workflow_name
argument.
B.3.1. Directories
Given an --output-dir argument of my_emews_project, the default directory structure
produced by all the workflow types is:
my_emews_project/
├── data
├── etc
│   └── emews_utils.sh
├── ext
│   └── emews
│       └── emews.swift
├── python
│   └── test
├── R
│   └── test
├── README.md
├── scripts
│   └── run_my_model_sweep_workflow.sh
└── swift
    ├── cfgs
    │   └── sweep_workflow.cfg
    ├── run_sweep_workflow.sh
    └── sweep_workflow.swift
The directories are intended to contain the following:
-
data- data required by the model and model exploration algorithm (e.g., input data). -
etc- additional code used by EMEWS -
ext- Swift/T (hereafter swift) extensions, including the default EMEWS utility code extension as well as the EQ/R and EQ/Py extensions when creating eqr or eqpy workflows -
python- Python code (e.g., model exploration algorithms written in Python) -
python\test- tests of the Python code -
R- R code (e.g., model exploration algorithms written R) -
R\test- tests of the R code -
scripts- any necessary scripts (e.g., scripts to launch a model), excluding scripts used to run the workflow -
swift- swift code and scripts used run the workflow
B.3.2. Files
Each of the workflow types will generate the following files. The file names
are derived from parameters specified in the workflow template configuration
arguments. The names of those parameters are included in curly brackets
in the file names below. (Note that in the above directory listing, the workflow_name
was sweep_workflow.)
-
swift/run_{workflow_name}.sh- a bash script used to launch / submit the workflow -
swift/{workflow_name}.swift- the swift script that implements the workflow. -
scripts/run_{model_name}_{workflow_name}.sh- a bash script used to run the model application. -
cfgs/{workflow_name}.cfg- a configuration file for running the workflow -
README.md- a README file for the workflow
These files may require some user customization before they can be used. The
relevant sections are marked with TODO.
Once the required edits are completed, the workflows can be run with:
$ run_{workflow_name}.sh <experiment_name> cfgs/{workflow_name}.cfg
B.4. Workflow Templates
Each workflow template has its own set of command line arguments, but all have the following in common:
-
-n, --workflow-name- the name of the workflow. This will be used as the file name for the workflow configuration, submission, and swift script files. Spaces will be replaced by underscores. Theworkflow_nameshould be unique among all the workflows in the output directory. -
-c, --config- path to the workflow template configuration file, optional if all the required arguments are specified on the command line
The workflow template configuration file can be used to specify any of a
workflow template’s configuration parameters when those parameters are
not specified on the command line. This file is in yaml format.
As mentioned above, sample configuration files can be found
here
in the example_cfgs directory in the EMEWS Creator github repository. Arguments
supplied on the command line will override those supplied in a configuration file.
If any required arguments are missing from the command line, then the
configuration file is required to supply the missing arguments.
B.4.1. Sweep
The sweep command creates a sweep workflow in which EMEWS reads an input file, and runs an application using each line of the input file as input to an application run. We call this input file an unrolled parameter file or UPF file, as it contains a full explicit listing of all the parameter combinations to run, rather than some more terse sweep description. The following is the EMEWS sweep workflow structure:
Usage:
$ emewscreator sweep -h
Usage: emewscreator sweep [OPTIONS]

Options:
  -c, --config PATH         Path to the template configuration file
                            [required if any command line arguments are
                            missing]

  -n, --workflow-name TEXT  Name of the workflow
  -h, --help                Show this message and exit.
A sample sweep configuration file can be found here.
Generating a sweep workflow creates the following files. The exact file names are dependent on
the workflow_name and model_name configuration parameters. Here the workflow name is sweep workflow
and the model name is my model.
-
swift/run_sweep_workflow.sh- a bash script used to launch the workflow -
swift/sweep_workflow.swift- a swift script that will iterate through an input file, passing each line of that input to a model -
scripts/run_my_model_sweep_workflow.sh- a bash script for executing the model. The swift script calls this script to run the model, passing it one line of input from the input file. -
swift/cfgs/sweep_workflow.cfg- the configuration file for the workflow, specifying the location of the sweep input file, among other parameters.
These files contain lines or sections marked with TODO where that line or section needs to be edited to customize the file for your model and workflow. See Use Case 1 Tutorial - Simple Workflows with ABM for a fully fleshed out sweep workflow created using EMEWS Creator. We will look more closely at relevant parts of these files next.
| The launch scripts produced by the EMEWS Creator source other files. Doing this in a bash script makes any variables and functions defined in those files available to the current file, as if they had been defined in the current file. |
The initial section of the file processes the input arguments to the file, initalizing some variables that are used in the following parts of the file.
#! /usr/bin/env bash
set -eu

if [ "$#" -ne 2 ]; then    (1)
  script_name=$(basename $0)
  echo "Usage: ${script_name} exp_id cfg_file"
  exit 1
fi

# Uncomment to turn on swift/t logging. Can also set TURBINE_LOG,
# TURBINE_DEBUG, and ADLB_DEBUG to 0 to turn off logging
# export TURBINE_LOG=1 TURBINE_DEBUG=1 ADLB_DEBUG=1
export EMEWS_PROJECT_ROOT=$( cd $( dirname $0 )/.. ; /bin/pwd )    (2)
# source some utility functions used by EMEWS in this script
source "${EMEWS_PROJECT_ROOT}/etc/emews_utils.sh"    (3)

export EXPID=$1
export TURBINE_OUTPUT=$EMEWS_PROJECT_ROOT/experiments/$EXPID    (4)
check_directory_exists

CFG_FILE=$2
source $CFG_FILE (5)| 1 | Check that the number of arguments passed to the script is equal to 2. The first should be the name of the experiment, and the second a configuration file that will be sourced into the current environment. |
| 2 | Define an EMEWS_PROJECT_ROOT environment variable that specifies the root directory of the project.
This corresponds to the root project directory specified in --output-dir when running
emewscreator. |
| 3 | Source utility functions that are used later in the script. These are: check_directory_exists which checks if the TURBINE_OUTPUT directory exists and prompts the user to continue; and log_script which logs the relevant environment variables and a copy of script to the TURBINE_OUTPUT directory. |
| 4 | Creates and exports an EXPID (an experiment id) environment variable from the experiment id passed into the script and then defines the TURBINE_OUTPUT directory using this EXPID. The TURBINE_OUTPUT directory is used by swift as the
output location for all the files that it produces. |
| 5 | Creates a CFG_FILE environment variable from the second argument passed into the script, and sources this file. In this way the configuration variables, such as the file to sweep over, are made available to the launch script. |
The second part of the file exports variables that are used by swift when submitting the workflow on an HPC resource. Typically such machines use a job scheduler that requires the user to provide the number of processes to use, the name of the compute queue, the project to charge the compute time to, and an estimate of how long the job will take. This section exports those values so that they are available to swift when creating the job submission script. These are set from values defined in the workflow configuration file (i.e., swift/cfgs/sweep_workflow.cfg). See the discussion of that file below.
export PROCS=$CFG_PROCS    (1)
export QUEUE=$CFG_QUEUE
export PROJECT=$CFG_PROJECT
export WALLTIME=$CFG_WALLTIME
export PPN=$CFG_PPN
export TURBINE_JOBNAME="${EXPID}_job"    (2)
export TURBINE_MPI_THREAD=1 (3)| 1 | PROCS, QUEUE, PROJECT, WALLTIME, and PPN are set from variables defined
in the configuration file. |
| 2 | TURBINE_JOBNAME is used to set the name of the job in the HPC submission script.
When querying the HPC resource for the status of your job, you will see your job
name as the experiment id following by _job. |
| 3 | Set TURBINE_MPI_THREAD to one to run MPI in a thread-safe mode to prevent any errors
if the model is multi-threaded. |
The launch scripts for all the available workflow types copy all the relevant
files into the experiment directory (i.e., TURBINE_OUTPUT) so that the original
files can be changed without corrupting the workflow. We see that in the next
section together with some variable declarations and some potential TODOs.
mkdir -p $TURBINE_OUTPUT    (1)
cp $CFG_FILE $TURBINE_OUTPUT/cfg.cfg    (2)

# TODO: If R cannot be found, then these will need to be   (3)
# uncommented and set correctly.
# export R_HOME=/path/to/R
# export LD_LIBRARY_PATH=$LD_LIBRARY_PATH:$R_HOME/lib

# TODO: If Python cannot be found or there are "Cannot find     (4)
# X package" type errors then these two environment variables
# will need to be uncommented and set correctly.
# export PYTHONHOME=/path/to/python
# export PYTHONPATH=$EMEWS_PROJECT_ROOT/python

EMEWS_EXT=$EMEWS_PROJECT_ROOT/ext/emews    (5)

# Copies UPF file to experiment directory
U_UPF_FILE=$EMEWS_PROJECT_ROOT/$CFG_UPF
UPF_FILE=$TURBINE_OUTPUT/upf.txt
cp $U_UPF_FILE $UPF_FILE (6)| 1 | Make the TURBINE_OUTPUT experiment directory |
| 2 | Copy the workflow configuration file into the experiment directory |
| 3 | If there are errors when running R code in workflows, this section can be edited appropriately and uncommented. |
| 4 | If there are errors when running Python code in workflows, this section can be edited appropriately and uncommented. |
| 5 | Set an environment directory for the EMEWS swift extensions. This is used internally by the workflow, and should not be edited. |
| 6 | Copy the UPF file to experiment directory as upf.txt. This
is the file containing the sweep input, one parameter set per line. |
The launch script pass arguments to the swift script via the command line. We define a variable that represents the command line and pass the location of the UPF file using that.
CMD_LINE_ARGS="$* -f=$UPF_FILE "
# CMD_LINE_ARGS can be extended with +=:
# CMD_LINE_ARGS+="-another_arg=$ANOTHER_VAR"
When submitting the workflow on an HPC machine, the type of job scheduled must be set in order for swift to correctly submit the job. This is done in the next section.
# TODO: Set MACHINE to your schedule type (e.g. pbs, slurm, cobalt etc.),
# or empty for an immediate non-queued unscheduled run
MACHINE=""

if [ -n "$MACHINE" ]; then
  MACHINE="-m $MACHINE"
fi

# TODO: Some slurm machines may expect jobs to be run
# with srun, rather than the default mpiexec (for example). If
# so, uncomment this export.
# export TURBINE_LAUNCHER=srun
The final section logs a copy of the submission script to the experiment directory and calls swift to submit the job and execute the workflow swift script.
# TODO: Add any script variables that you want to log as
# part of the experiment meta data to the USER_VARS array,
# for example, USER_VARS=("VAR_1" "VAR_2")
USER_VARS=()
# log variables and script to to TURBINE_OUTPUT directory
log_script    (1)
# echo's anything following this to standard out
set -x
SWIFT_FILE=sweep_workflow.swift    (2)
swift-t -n $PROCS $MACHINE -p \    (3)
    -I $EMEWS_EXT -r $EMEWS_EXT \
    -e TURBINE_MPI_THREAD \    (4)
    -e TURBINE_OUTPUT \
    -e EMEWS_PROJECT_ROOT \
    $EMEWS_PROJECT_ROOT/swift/$SWIFT_FILE \
$CMD_LINE_ARGS (5)| 1 | Log a copy of this submission script including any of the variables
in USER_VARS to the experiment directory. |
| 2 | Define a variable containing the name of the swift workflow script to execute. |
| 3 | Call swift passing it the relevant variables and the path of the swift script to be executed. At this point the script is either executed immediately or scheduled for execution depending on the value of the MACHINE variable. |
| 4 | The -e argument to swift adds the specified variable to the script execution environment. On some HPC machines,
the login environment is separate from the compute environment. Consequently, variables defined in the login environment
that are referenced in the swift script when it executes in the compute environment need to be made available for the
script to work correctly. The -e argument does this, adding the specified variables to the compute environment. |
| 5 | Pass the CMD_LINE_ARGS to the swift script. |
This file is the swift script that performs the actual sweep. The script consists of an opening section that
defines some variables, and 3 functions, one run_model that calls the model itself, one make_dir utility
function, and a main function that performs the sweep.
string emews_root = getenv("EMEWS_PROJECT_ROOT");    (1)
string turbine_output = getenv("TURBINE_OUTPUT");

file model_sh = input(emews_root+"/scripts/run_my_model_sweep_workflow.sh");    (2)
file upf = input(argv("f")); (3)| 1 | Set emews_root and turbine_output from the EMEWS_PROJECT_ROOT and TURBINE_OUTPUT
environment variables. These were exported in the
run_sweep_workflow.sh script. |
| 2 | Get the bash script that will be used to launch the model. Swift calls this script
(scripts/run_my_model_sweep_workflow.sh) to perform a model run. |
| 3 | Get the upf file by parsing the -f argument to this script. The -f argument was specified in
as part of the CMD_LINE_ARGS in the run_sweep_workflow.sh script. |
The run_model function executes a single model run via a bash script. It calls bash, passing it the name of the bash
script to run, the parameter line (from the upf file) to use, the EMEWS_PROJECT_ROOT directory, and the path of an instance directory. The expectation is that each model run will execute in its own directory and instance is the path of that directory. Standard out and standard error are redirected to an out and err file, respectively.
// app function used to run the model
app (file out, file err) run_model(file shfile, string param_line, string instance)
{
    "bash" shfile param_line emews_root instance @stdout=out @stderr=err;    (1)
}| 1 | Call bash to run the model script specified in the previous section, redirecting
stdout and stderr to file out and file err, respectively. |
When we run the model, we want each to run in its own instance directory, and we
need a function to create that directory. make_dir is a swift app function
that calls the operating system’s mkdir command to create the directory.
// call this to create any required directories
app (void o) make_dir(string dirname) {
    "mkdir" "-p" dirname;
}
The main function iterates over each line of the upf file, passing each line
to the model script to run.
// Iterate over each line in the upf file, passing each line
// to the model script to run
main() {
    // run_prerequisites() => {
    string upf_lines[] = file_lines(upf);    (1)
    foreach s,i in upf_lines {    (2)
        string instance = "%s/instance_%i/" % (turbine_output, i+1);   (3)
        make_dir(instance) => {    (4)
            file out <instance+"out.txt">;    (5)
            file err <instance+"err.txt">;
            (out,err) = run_model(model_sh, s, instance);    (6)
        }
    }
    // }
}| 1 | Read all the lines from the upf file into a string array upf_lines. |
| 2 | For each line in the array, executing the code within the block. This
will run in parallel, executing as many lines concurrently as there are
available workers. Here s is the element at index i in the upf_lines array,
such that i corresponds to the line number in the upf file itself. |
| 3 | Create the name of the instance directory that we pass to each model execution,
using i to uniquely name each instance directory. |
| 4 | Call make_dir to create each instance directory. |
| 5 | Create the files into which the stdout and stderr will
be written for each model run in each instance directory, naming
them out.txt and err.txt. |
| 6 | Call run_model to execute the model run. |
run_my_model_sweep_workflow.sh is called by sweep_workflow.swift to execute
the model as if the model has been run from the command line. The script is passed a
single line of parameters from the upf file, the
emews root directory location, and the instance directory created in sweep_workflow.swift.
You will need to update the MODEL_CMD variable to specify the model executable.
The script begins with defining an optional TIMEOUT that will timeout
the model if its run duration exceeds that value.
# Check for an optional timeout threshold in seconds. If the duration of the
# model run as executed below, takes longer that this threshold
# then the run will be aborted. Note that the "timeout" command
# must be supported by executing OS.

# The timeout argument is optional. By default the "run_model" swift
# app function sends 3 arguments, and no timeout value is set. If there
# is a 4th (the TIMEOUT_ARG_INDEX) argument, we use that as the timeout value.

# !!! IF YOU CHANGE THE NUMBER OF ARGUMENTS PASSED TO THIS SCRIPT, YOU MUST
# CHANGE THE TIMEOUT_ARG_INDEX !!!
TIMEOUT=""
TIMEOUT_ARG_INDEX=4    (1)
if [[ $# ==  $TIMEOUT_ARG_INDEX ]]
then
	TIMEOUT=${!TIMEOUT_ARG_INDEX}
fi

TIMEOUT_CMD=""
if [ -n "$TIMEOUT" ]; then
  TIMEOUT_CMD="timeout $TIMEOUT"
fi| 1 | If this script is passed TIMEOUT_ARG_INDEX number of arguments,
then that argument (defaulting to the 4th argument) will be used as
the number of seconds after which to timeout. |
The next section of the script assigns the scripts command line arguments to some variables and changes directory to the instance directory passed to the script.
# Set PARAM_LINE from the first argument to this script
# PARAM_LINE is the string containing the model parameters for a run.
PARAM_LINE=$1

# Set EMEWS_ROOT to the root directory of the project (i.e. the directory
# that contains the scripts, swift, etc. directories and files)
EMEWS_ROOT=$2

# Each model run, runs in its own "instance" directory
# Set INSTANCE_DIRECTORY to that and cd into it.
INSTANCE_DIRECTORY=$3
cd $INSTANCE_DIRECTORY
The final section defines the model executable in MODEL_CMD and runs
the model with the optional timeout.
# TODO: Define the command to run the model. For example,
# MODEL_CMD="python"
MODEL_CMD=""    (1)
# TODO: Define the arguments to the MODEL_CMD. Each argument should be
# surrounded by quotes and separated by spaces. For example,
# arg_array=("$EMEWS_ROOT/python/my_model.py" "$PARAM_LINE")
arg_array=("arg1" "arg2" "arg3")    (2)
COMMAND="$MODEL_CMD ${arg_array[@]}"

# Turn bash error checking off. This is
# required to properly handle the model execution
# return values and the optional timeout.
set +e
echo "Running $COMMAND"

$TIMEOUT_CMD $COMMAND    (3)
# $? is the exit status of the most recently executed command (i.e the
# line above)
RES=$?
if [ "$RES" -ne 0 ]; then
	if [ "$RES" == 124 ]; then
    echo "---> Timeout error in $COMMAND"
  else
	   echo "---> Error in $COMMAND"
  fi
fi| 1 | Define the model executable. For a stand alone compiled executable, this will be the
path to that executable. For example, something like $HOME/sfw/epi_model-1.0/bin/epimodel.
For a model written in an interpreted language such as R or Python, this will be the R/RScript or Python
executable. |
| 2 | Define the array of arguments to pass to the MODEL_CMD executable. At the very
least, this will typically include the PARAM_LINE variable in order to pass the
upf line to the model. For an R or Python application, this will also include
the path to the R or Python code to run. |
| 3 | Run the model with the optional TIMEOUT_CMD. If no TIMEOUT was specified, this
will be empty. |
The final file produced by the emewscreator for the sweep workflow is
sweep_workflow.cfg.
This file is sourced by the submission script run_sweep_workflow.sh to retrieve the HPC scheduler parameters for the workflow and the location
of the upf file. The intention here is that these parameters are the most frequently changed between
different workflow runs, and rather than edit the submission script itself, it is easier to edit
a configuration file.
CFG_WALLTIME=24:00:00   (1)
CFG_QUEUE=queue    (2)
CFG_PROJECT=project    (3)
NODES=4    (4)
CFG_PPN=4    (5)
CFG_PROCS=$(( NODES * CFG_PPN ))    (6)
# TODO: Update with path to upf file, relative
# to emews project root directory.
CFG_UPF=data/upf.txt (7)| 1 | Set the estimated duration of the workflow. |
| 2 | Set the queue on which to run the workflow. |
| 3 | Set the project with which to run the workflow. |
| 4 | Set the number of HPC nodes with which to run the workflow. |
| 5 | Set the number of processes per node (PPN) to use. |
| 6 | Compute the total number of processes to allocate to the job by multiplying the number of nodes by the PPN. |
| 7 | Set the path to the UPF file. For convenience, this is relative to the emews project root directory. |
See your HPC resource’s documentation for details on the appropriate values and formats
for CFG_WALLTIME, CFG_QUEUE, and CFG_PROJECT.
|
B.4.2. EQPy
The EQPy workflow template creates a workflow that uses EMEWS Queues for Python (EQ/Py) to execute an application using input parameters provided by a Python model exploration (ME) algorithm. EQ/Py is a swift extension that adds two blocking queues through which a swift script and a Python algorithm can coordinate execution. The following is the EMEWS workflow structure with EQ/Py:
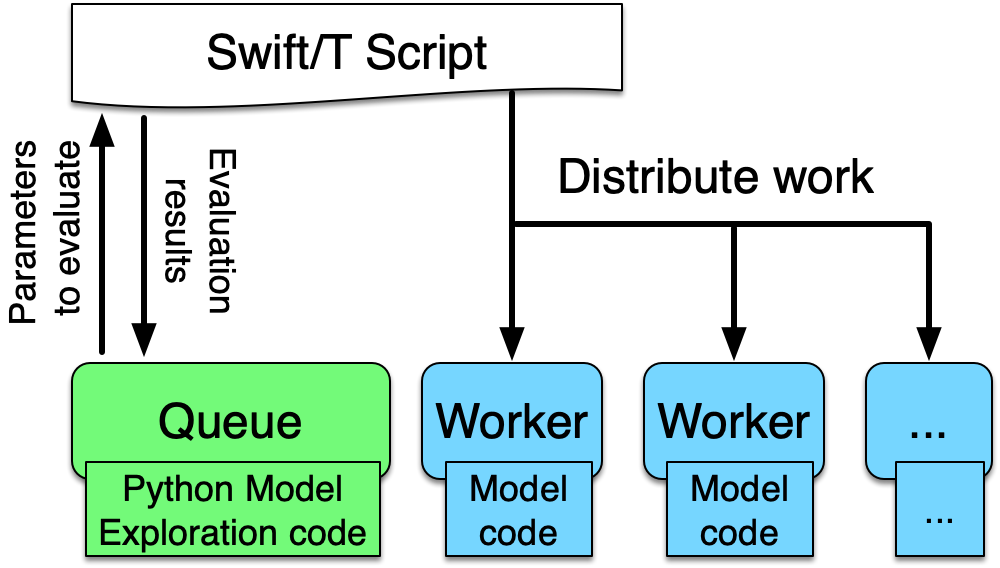
and this is a zoomed in picture showing the Python-based ME and swift script queue coordination.
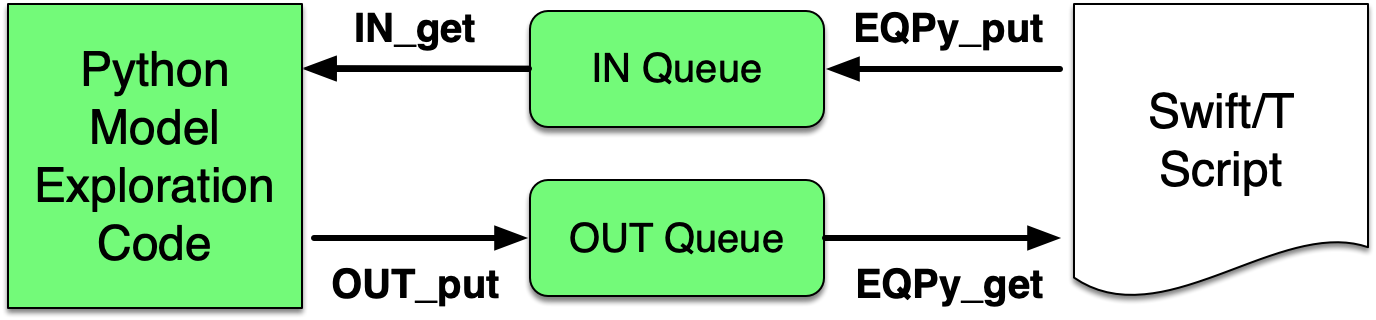
The eqpy template installs this extension and adds user customizable code that allows model runs and exploration to be controlled from a Python algorithm using the two queues. By default the coordinated execution of the two follows this pattern:
-
The swift script initializes the EQ/Py extension, including the the Python code, and then waits for the Python code to produce parameters for a parallelized collection of model runs.
-
The Python code produces an initial set of parameters.
-
The Python code passes these parameters to the swift script.
-
The Python code then waits for the swift code.
-
Having received the parameters for the model runs, the swift script launches those runs in parallel.
-
When the model runs are finished, the swift script passes a result derived from the output of those runs back to the Python code.
-
The swift script then waits for the next set of parameters or a flag indicating that no more runs need to be performed.
-
Having received the results from the swift script, the Python code algorithm produces a new set of parameters based on the swift result, and passes those back to the waiting swift script.
Steps 5 - 8 are repeated until a stopping condition (e.g., algorithm convergence or some maximum number of iterations) is reached.
Usage:
$ emewscreator eqpy -h

Usage: emewscreator eqpy [OPTIONS]

Options:
  -c, --config PATH              Path to the template configuration file
                                 [required if any command line arguments are
                                 missing]

  -n, --workflow-name TEXT       Name of the workflow
  --module-name TEXT             Python model exploration algorithm module
                                 name

  --me-cfg-file PATH             Configuration file for the model exploration
                                 algorithm

  --trials INTEGER               Number of trials / replicates to perform for
                                 each model run. Defaults to 1

  --model-output-file-name TEXT  Model output base file name, file name only
                                 (e.g., "output.csv")

  --eqpy-dir PATH                Directory where the eqpy extension is
                                 located. If the extension does not exist at
                                 this location it will be installed there.
                                 Defaults to {output_dir}/ext/EQ-Py

  -h, --help                     Show this message and exit.
In addition to the common configuration arguments described in Workflow Templates the eqpy template also has the following arguments:
-
--module-name- the Python module implementing the ME algorithm -
--me-cfg-file- the path to a configuration file for the Python ME algorithm. This path will be passed to the Python ME when it is initialized. This is relative to the directory specified in--output-dir. -
--trials- the number of trials or replicates to perform for each model run. Defaults to 1. -
model-output-file-name- each model run is passed a file path for writing its output. This is the name of that file.
In addition to the default set of files described in the EMEWS Project Structure section, the
eqpy workflow template will also install the EQPy EMEWS swift extension. By default, the extension will be installed in in ext/EQ-Py. An alternative location can be specified with the --eqpy-dir
configuration parameter.
-
--eqpy-dir- specifies the location of the eqpy extension (defaults toext/EQ-Py)
You can set this to use an existing EQ-Py extension, or if the specified location doesn’t exist, the extension will be installed there.
The extension consists of the following files.
-
eqpy.py -
EQPy.swift
These should not be edited by the user.
A sample eqpy configuration file can be found here.
Generating an EQPy workflow creates the following files. The exact file names are dependent on
the workflow_name and model_name configuration parameters. Here the workflow name is eqpy workflow
and the model name is my model.
-
swift/run_eqpy_workflow.sh- a bash script used to launch the workflow -
swift/eqpy_workflow.swift- a swift script that will initialize a Python ME algorithm, and wait for that algorithm to pass it parameters to execute in model runs. -
scripts/run_my_model_eqpy_workflow.sh- a bash script for executing the model. The swift script calls this script to run the model, passing it the parameters produced by the Python ME algorithm. -
swift/cfgs/eqpy_workflow.cfg- the configuration file for the workflow
These files contain lines or sections marked with TODO where that line or section needs to be edited to customize the file for your model and workflow.
More details to come.
More details to come.
More details to come.
More details to come.
B.4.3. EQR
The eqr template works much the same as the eqpy template, but for ME algorithms written in R. It generates files and code for ME using the EQ/R EMEWS extension. The EQ/R extension adds two blocking queues through which a swift script and a R algorithm can coordinate execution. The following is the EMEWS workflow structure with EQ/R:
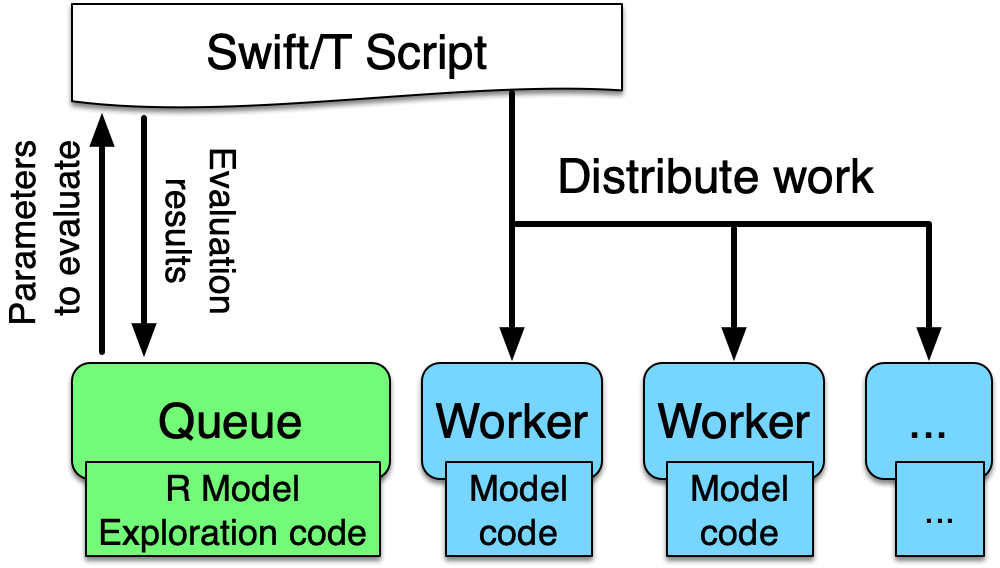
and this is a zoomed in picture showing the R-based ME and swift script queue coordination.
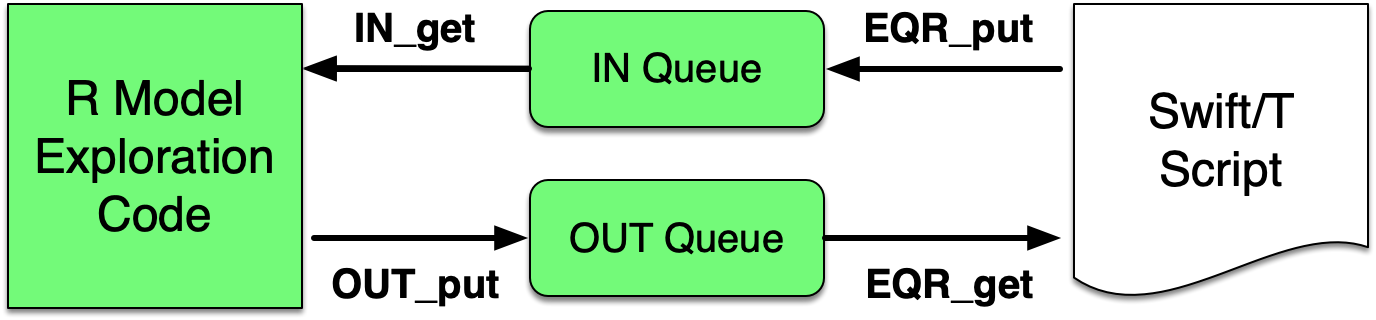
The eqr template installs this extension and adds user customizable code that allows model runs and exploration to be controlled from a R algorithm using the two queues. By default the coordinated execution of the two uses the following pattern (identical to that of the eqpy template).
-
The swift script initializes the EQ/R extension, including the the R code, and then waits for the R code to produce parameters for a parallelized collection of model runs.
-
The R code produces an initial set of parameters.
-
The R code passes these parameters to the swift script.
-
The R code then waits for the swift script.
-
Having received the parameters for the model runs, the swift script launches those runs in parallel.
-
When the model runs are finished, the swift script passes a result derived from the output of those runs back to the R code.
-
The swift script then waits for the next set of parameters or a flag indicating that no more runs need to be performed.
-
Having received the results from the swift script, the R code algorithm produces a new set of parameters based on the swift result, and passes those back to the waiting swift script.
Steps 5 - 8 are repeated until a stopping condition (e.g., algorithm convergence or some maximum number of iterations) is reached.
Usage:
$ emewscreator eqr -h
Usage: emewscreator eqr [OPTIONS]

Options:
  -c, --config PATH              Path to the template configuration file
                                 [required if any command line arguments are
                                 missing]

  -n, --workflow-name TEXT       Name of the workflow
  --script-file TEXT             Path to the R model exploration algorithm
  --me-cfg-file PATH             Configuration file for the model exploration
                                 algorithm

  --trials INTEGER               Number of trials / replicates to perform for
                                 each model run

  --model-output-file-name TEXT  Model output base file name, file name only
                                 (e.g., "output.csv")

  --eqr-dir PATH                 Directory where the eqr extension is located.
                                 If the extension does not exist at this
                                 location it will be installed there. Defaults
                                 to {output_dir}/ext/EQ-R

  -h, --help                     Show this message and exit.
In addition to the common configuration parameters described in Workflow Templates
the eqr template also has the following arguments:
-
--script-file- the path to the R script implementing the ME algorithm -
--me-cfg-file- the path to a configuration file for the R ME algorithm. This path will be passed to the R ME when it is initialized. This path is relative to the directory specified by--output-dir. -
--trials- the number of trials or replicates to perform for each model run -
--model_output_file_name- each model run is passed a file path for writing its output. This is the name of that file.
In addition to the default set of files described in the EMEWS Project Structure
section, the eqr workflow template will also
install the source for the EQ/R EMEWS swift extension. By default, the extension will be typically be installed
in ext/EQ-R. If EMEWS Creator has been installed as part of a binary install using
the EMEWS installer, the default location will updated to reflect that. However, an alternative location can be specified with the --eqr-dir configuration argument, if necessary.
-
--eqr-dir- specifies the location of the eqr extension
If EMEWS Creator has been installed as part of a binary EMEWS stack install, the EQ-R extension binary will be included,
and the --eqr-dir argument does not need to be specified. Otherwise, you can set this to use an existing EQ-R extension, or if the specified location doesn’t exist, the extension will be installed there.
The extension needs to be compiled before it can be used. See {eqr_dir}/src/README.md for compilation instructions. If EMEWS Creator has been installed as part of a binary install using the EMEWS installer, compilation is NOT necessary.
|
A sample EQR configuration file can be found here.
Generating an EQR workflow creates the following files. The exact file names are dependent on
the workflow_name and model_name configuration parameters. Here the workflow name is eqr workflow
and the model name is my model.
-
swift/run_eqr_workflow.sh- a bash script used to launch the workflow -
swift/eqr_workflow.swift- a swift script that will initialize a R ME algorithm, and wait for that algorithm to pass it parameters to execute in model runs. -
scripts/run_my_model_eqr_workflow.sh- a bash script for executing the model. The swift script calls this script to run the model, passing it the parameters produced by the Python ME algorithm. -
swift/cfgs/eqr_workflow.cfg- the configuration file for the workflow
These files contain lines or sections marked with TODO where that line or section needs to be edited to customize the file for your model and workflow.
More details to come.
More details to come.
More details to come.
More details to come.
B.4.4. EQSQL
The eqsql command creates a workflow that submits tasks (such as application runs) to a database queue. Worker pools pop tasks off this queue for evaluation, and push the results back to a database input queue. The tasks can be provided by a Python or R language ME algorithm.
Usage:
$emewscreator eqsql -h
Usage: emewscreator eqsql [OPTIONS]

Options:
  -c, --config PATH              Path to the template configuration file.
                                 [required if any command line arguments are
                                 missing]
  --pool-id TEXT                 The name of the task worker pool.
  --task-type INTEGER            The task type id for the tasks consumed by
                                 the worker pool.
  -n, --workflow-name TEXT       Name of the workflow.
  --trials INTEGER               Number of trials / replicates to perform for
                                 each model run. Defaults to 1.
  --model-output-file-name TEXT  Model output base file name, file name only
                                 (e.g., "output.csv").
  --me-language [python|R|None]  Model exploration algorithm programming
                                 language: Python, R, or None.
  --me-file-name TEXT            The name of the model exploration algorithm
                                 template file to generate. Omit the extension
                                 (e.g., "algo", not "algo.py").
  --me-cfg-file-name TEXT        The name of the model exploration algorithm
                                 configuration file.
  --esql-db-path PATH            The path to the eqsql database.
  -h, --help                     Show this message and exit.
A sample eqsql configuration file can be found here.
In addition to the common configuration arguments described [above](#workflow_templates), the eqsql template also has the following arguments:
-
--pool-id- a unique identifier for the swift worker pool created by the template. -
--task-type- an integer identifying the type of task the worker pool will consume. -
--trials- the number of trials or replicates to perform for each task evaluation. Defaults to 1. -
--model-output-file-name- each task evaluation is passed a file path for writing its output. This is the name of that file. -
--me-language- the ME programming language (R, Python, None). The template will create an example ME written in this language. If the value isNone, then no ME example file will be created. -
--me-cfg-file-name- the name of the yaml format configuration file used to configure the example ME. -
--esql-db-path- the path to the eqsql database. This is used by the example ME to start the database.
Generating an eqsql workflow, creates the following files, the contents of which reflect the
arguments (e.g., pool_id.) above. The exact file names are dependent on
the workflow_name, and model_name configuration parameters. In the following, the workflow name
was set to eqsql, and the model name to my model.
If Python or R is specified in the me_language parameter, then an example
ME algorithm and configuration file are created. Here, the me_language is Python,
the me_file_name is algo, and the me_cfg_file_name is algo_cfg.
-
swift/run_eqsql_worker_pool.sh- a bash script used to launch the worker pool -
swift/eqsql_worker_pool.swift- a swift script the implements an eqsql worker pool -
scripts/run_my_model.sh- a bash script for executing the model. The swift script calls this script, passing it task parameters from the ME via the database. -
python/algo.py- an example eqsql ME in Python. The file name is specified by theme_file_nameconfiguration parameter. -
python/algo_cfg.yaml- the configuration file for the example ME. The file name is specified by theme_cfg_file_nameparameter -
ext/EQ-SQL/EQSQL.swift- swift code used by worker pools to retrieve tasks and report results to the eqsql database. Typically this should not be edited by the user. -
ext/EQ-SQL/eqsql_swift.py- Python code used by worker pools to retrieve tasks and report results to the eqsql database. Typically, this should not be edited by the user.
These files (excluding those in ext/EQ-SQL) contain lines or sections marked with TODO where that line or section needs
to be edited to customize the file for your model and workflow. See Use Case 4 Tutorial - An EQSQL Workflow for a fully fleshed out
eqsql workflow created using EMEWS Creator. We look more closely at relevant parts of these files
next.
| The launch scripts produced by the EMEWS Creator source other files. Doing this in a bash script makes any variables and functions defined in those files available to the current file, as if they had been defined in the current file. |
The initial section of the file processes the input arguments to the file, and initializes variables that are used in the following parts of the file.
#! /usr/bin/env bash
set -eu

if [ "$#" -ne 2 ]; then    (1)
  script_name=$(basename $0)
  echo "Usage: ${script_name} exp_id cfg_file"
  exit 1
fi

# Uncomment to turn on swift/t logging. Can also set TURBINE_LOG,
# TURBINE_DEBUG, and ADLB_DEBUG to 0 to turn off logging
# export TURBINE_LOG=1 TURBINE_DEBUG=1 ADLB_DEBUG=1
export EMEWS_PROJECT_ROOT=$( cd $( dirname $0 )/.. ; /bin/pwd )    (2)
# source some utility functions used by EMEWS in this script
source "${EMEWS_PROJECT_ROOT}/etc/emews_utils.sh"    (3)

export EXPID=$1    (4)
export TURBINE_OUTPUT=$EMEWS_PROJECT_ROOT/experiments/$EXPID    (5)
check_directory_exists

CFG_FILE=$2    (6)
source $CFG_FILE| 1 | Check that the number of arguments passed to the script is equal to 2. The first should be the name of the experiment, and the second a configuration file that will be sourced into the current environment. |
| 2 | Define an EMEWS_PROJECT_ROOT environment variable that specifies the root directory of the project.
This corresponds to the root project directory specified in --output-dir when running
emewscreator. |
| 3 | Source utility functions that are used later in the script. These are: check_directory_exists
which checks if the TURBINE_OUTPUT directory exists and prompts the user to continue; and log_script
which logs the relevant environment variables and a copy of script to the TURBINE_OUTPUT directory. |
| 4 | Define and export an EXPID (an experiment id) environment variable from the experiment id passed
into the script. |
| 5 | Define the TURBINE_OUTPUT directory using the EXPID. The TURBINE_OUTPUT directory is the
sandbox directory in which the application runs, and is used by swift as the
output location for all the files that it produces. |
| 6 | Create a CFG_FILE environment variable from the second argument passed into the script, and source this file. In this way the configuration variables which may change from workflow run to workflow run are included into this submission script. |
The second part of the file exports variables that are used by swift
when submitting the workflow on an HPC resource. Typically such machines use
a job scheduler that requires the user to provide the number of processes
to use, the name of the compute queue, the project to charge the compute time
to, and an estimate of how long the job will take. This section exports
those values so that they are available to swift when creating the job submission
script. These are set from values defined in the workflow configuration file
(i.e., swift/cfgs/eqsql_worker_pool.cfg).
export PROCS=$CFG_PROCS    (1)
export QUEUE=$CFG_QUEUE
export PROJECT=$CFG_PROJECT
export WALLTIME=$CFG_WALLTIME
export PPN=$CFG_PPN
export TURBINE_JOBNAME="${EXPID}_job"    (2)
export TURBINE_MPI_THREAD=1 (3)| 1 | PROCS, QUEUE, PROJECT, WALLTIME, and PPN are set from variables defined
in the configuration file. See that section for more information. |
| 2 | TURBINE_JOBNAME is used to set the name of the job in the HPC submission script.
When querying the HPC resource for the status of your job, you will see your job
name as the experiment id following by _job. |
| 3 | Set TURBINE_MPI_THREAD to one to run MPI in a thread-safe mode to prevent any errors
if the model is multi-threaded. |
The launch script copies all the relevant
files into the experiment directory (i.e., the TURBINE_OUTPUT value) so that the original
files can be changed without corrupting the workflow. We see that in the next
section together with some variable declarations and potential TODOs.
mkdir -p $TURBINE_OUTPUT    (1)
cp $CFG_FILE $TURBINE_OUTPUT/cfg.cfg    (2)

# TODO: If R cannot be found, then these will need to be   (3)
# uncommented and set correctly.
# export R_HOME=/path/to/R
# export LD_LIBRARY_PATH=$LD_LIBRARY_PATH:$R_HOME/lib

# EQSQL swift extension location
EQSQL=$EMEWS_PROJECT_ROOT/ext/EQ-SQL    (4)
EMEWS_EXT=$EMEWS_PROJECT_ROOT/ext/emews    (5)

# TODO: if Python cannot be found then uncomment    (6)
# and edit this line.
# export PYTHONHOME=/path/to/python

# TODO: if there are "Cannot find
# X package" type Python errors then append
# the missing package's path to the PYTHONPATH
# variable below, separating the entries with ":"
export PYTHONPATH=$EMEWS_PROJECT_ROOT/python:$EQSQL (7)| 1 | Make the TURBINE_OUTPUT experiment directory |
| 2 | Copy the workflow configuration file into the experiment directory |
| 3 | If there are errors when running R code in workflows, this section can be edited appropriately and uncommented. |
| 4 | Set an environment variable for the EQ/SQL swift extension location. This is used internally by the workflow, and should not be edited. |
| 5 | Set an environment directory for the EMEWS swift extension location. This is used internally by the workflow, and should not be edited. |
| 6 | If there are errors when running Python code in workflows, this section can be edited appropriately and uncommented. |
| 7 | If any required Python packages cannot be found, their locations can be appended to the PYTHONPATH environment variable. |
The launch script also exports some database related variables: the database host, user, port and name. These are used by the swift script to communicate with the database. The values are sourced from the configuration file and they should be edited there if necessary. These variables will be further explained in the configuration file section.
# EQSQL DB variables, set from the CFG file.
# To change these, edit the CFG file.
export DB_HOST=$CFG_DB_HOST
export DB_USER=$CFG_DB_USER
export DB_PORT=${CFG_DB_PORT:-}
export DB_NAME=$CFG_DB_NAME
export EQ_DB_RETRY_THRESHOLD=$CFG_DB_RETRY_THRESHOLD
When submitting the workflow on an HPC machine, the type of HPC job scheduler must be set in order for swift to correctly submit the job. This is done in the next section. The else clause writes the worker pools stdout and stderr to a file when running on a non-queued unscheduled resource.
#TODO: Set MACHINE to your schedule type (e.g. pbs, slurm, cobalt etc.),
# or empty for an immediate non-queued unscheduled run
MACHINE=""

if [ -n "$MACHINE" ]; then
  MACHINE="-m $MACHINE"
else
  echo "Logging output to $TURBINE_OUTPUT/output.txt"
  # Redirect stdout and stderr to output.txt
  # if running without a scheduler.
  exec &> "$TURBINE_OUTPUT/output.txt"
fi
The launch script passes some arguments to the swift script, that it calls, via the command line. We define a variable that represents the command line and pass the number of trials (replicates), the worker pool task type, batch size, batch threshold and worker pool id using that variable. These arguments are all set via the configuration file and will be discussed in more detail there.
CMD_LINE_ARGS="--trials=$CFG_TRIALS --task_type=$CFG_TASK_TYPE --batch_size=$CFG_BATCH_SIZE "
CMD_LINE_ARGS+="--batch_threshold=$CFG_BATCH_THRESHOLD --worker_pool_id=$CFG_POOL_ID $*"
The final section logs a copy of the submission script to the experiment directory and calls swift to submit the job and execute the workflow swift script.
# TODO: Add any script variables that you want to log as
# part of the experiment meta data to the USER_VARS array,
# for example, USER_VARS=("VAR_1" "VAR_2")
USER_VARS=()
# log variables and script to to TURBINE_OUTPUT directory
log_script    (1)
# echo's anything following this to standard out
set -x
SWIFT_FILE=eqsql_worker_pool.swift    (2)
swift-t -n $PROCS $MACHINE -p -I $EQSQL -r $EQSQL \   (3)
    -I $EMEWS_EXT -r $EMEWS_EXT \
    -e TURBINE_MPI_THREAD \    (4)
    -e TURBINE_OUTPUT \
    -e EMEWS_PROJECT_ROOT \
    -e DB_HOST \
    -e DB_USER \
    -e DB_PORT \
    -e DB_NAME \
    -e EQ_DB_RETRY_THRESHOLD \
    -e PYTHONPATH \
    -e RESIDENT_WORK_RANK \
    $EMEWS_PROJECT_ROOT/swift/$SWIFT_FILE \
$CMD_LINE_ARGS (5)| 1 | Log a copy of this submission script including any of the variables
in USER_VARS to the experiment directory. |
| 2 | Define a variable containing the name of the swift workflow script to execute. |
| 3 | Call swift passing it the relevant variables and the path of the swift script to be executed. At this point
the script is compiled and then either executed immediately or scheduled for execution depending on the value of the MACHINE variable. |
| 4 | The -e argument to swift adds the specified variable to the script execution environment. On some HPC machines,
the login environment is separate from the compute environment. Consequently, variables defined in the login environment
that are referenced in the swift script when it executes in the compute environment need to be made available for the
script to work correctly. The -e argument does this, adding the specified variables to the compute environment. |
| 5 | Pass CMD_LINE_ARGS to the swift script. |
This file is the swift script that implements the worker pool. The worker pool pops tasks off of the database output queue and executes those tasks. When a task has completed, the worker pool pushes the result into the database input queue where it can be retrieved by the ME. The following will describe the general structure of the script, highlighting those areas most relevant to the user.
The script begins by defining some variables. The ones defined using the getenv function are
set from environment variables, while those those defined using argv are set from command
line arguments passed to the swift script from run_eqsql_worker_pool.sh.
string emews_root = getenv("EMEWS_PROJECT_ROOT");    (1)
string turbine_output = getenv("TURBINE_OUTPUT");
int resident_work_rank = string2int(getenv("RESIDENT_WORK_RANK"));

int TASK_TYPE = string2int(argv("task_type", "0"));    (2)
int BATCH_SIZE = string2int(argv("batch_size"));
int BATCH_THRESHOLD = string2int(argv("batch_threshold", "1"));
string WORKER_POOL_ID = argv("worker_pool_id", "default");

file model_sh = input(emews_root+"/scripts/run_my_model_eqsql_worker_pool.sh");    (3)
int n_trials = string2int(argv("trials", "1")); (4)| 1 | Set emews_root and turbine_output from the EMEWS_PROJECT_ROOT and TURBINE_OUTPUT environment variables. These were exported in the run_eqsql_worker_pool.sh script. |
| 2 | Set the TASK_TYPE, BATCH_SIZE, BATCH_THRESHOLD, and WORKER_POOL_ID variables. These are used by the swift script when fetching tasks and reporting task results. |
| 3 | Get the bash script that will be used to launch the model. Swift calls this script (scripts/run_my_model.sh) to perform a model run. |
| 4 | Get the number of trials (replicates) to perform for each model run. |
The script execution begins by calling the start function in which we initialize the task batch querying from the database.
(void o) start() {
  location querier_loc = locationFromRank(resident_work_rank);
  eq_init_batch_querier(querier_loc, WORKER_POOL_ID, BATCH_SIZE, BATCH_THRESHOLD, TASK_TYPE) =>    (1)
  loop(querier_loc) => {    (2)
    eq_stop_batch_querier(querier_loc);    (3)
    o = propagate();
  }
}

start() => printf("worker pool: normal exit.");| 1 | Initialize the batch querier for the worker pool identified by WORKER_POOL_ID,
requesting tasks of TASK_TYPE with the specified BATCH_SIZE, and BATCH_THRESHOLD. |
| 2 | Call the loop function in which tasks are retrieved, executed, and results reported. |
| 3 | Stop the batch querier, and exit the script. |
|
Batch querying allows a worker pool to request up to |
In the loop function, tasks are retrieved and dispatched for execution.
message msgs[] = eq_batch_task_query(querier_loc);    (1)
boolean c;
if (msgs[0].msg_type == "status") {    (2)
  if (msgs[0].payload == "EQ_STOP") {
    printf("loop.swift: STOP") =>
      v = propagate() =>
      c = false;
  } else {
    // sleep to give time for Python etc.
    // to flush messages
    sleep(5);
    printf("loop.swift: got %s: exiting!", msgs[0].payload) =>
    v = propagate() =>
    c = false;
  }
} else {
  run(msgs);    (3)
  c = true;
}| 1 | Query for tasks to execute, retrieving them in swift array. The tasks are formatted as message-s. Each message
has an integer task_id, a string msg_type, and string payload. The task_id is a unique
identifier for the task, the msg_type specifies the type of message: status or work.
The payload consists of either a status update, or input to the task to be performed in JSON format. |
| 2 | If the first of the message types is status then exit the loop with the appropriately. |
| 3 | If the first of the message types is not status, then execute the task messages in the array. |
The run function executes the tasks in parallel in a swift foreach loop, and reports the results back
to the database.
run(message msgs[]) {
  // printf("MSGS SIZE: %d", size(msgs));
  foreach msg, i in msgs {
    result_payload = run_task(msg.eq_task_id, msg.payload);
    eq_task_report(msg.eq_task_id, TASK_TYPE, result_payload);
  }
}
run_task executes the specified number of trials for an individual task (e.g., a model run), running the task with the same parameters and varying a random seed parameter. All the trials will run in an instance_N directory
where N is the task’s task_id.
(string obj_result) run_task(int task_id, string task_payload) {
    float results[];

    string instance = "%s/instance_%i/" % (turbine_output, task_id);
    mkdir(instance) => {    (1)
        foreach i in [0:n_trials-1:1] {    (2)
            int trial = i + 1;
            string instance_id = "i_%i" % (task_id, trial);
            results[i] = run_obj(task_payload, trial, instance, instance_id);    (3)
        }
    }

    obj_result = float2string(get_aggregate_result(results)); // =>    (4)
    // TODO: delete the ";" above, uncomment the ""=>"" above and
    // and the rm_dir below to delete the instance directory if
    // it is not needed after the result have been computed.
    // rm_dir(instance);
}| 1 | Create the instance directory |
| 2 | Iterate concurrently over the number of trials. |
| 3 | For each trial, call run_obj, passing the task payload (input parameters),
trial number, instance directory, and instance_id. The result from each trial
is added to the results array. |
| 4 | Call get_aggregate_result passing it the results from each trial to compute the
aggregate result over all the trials. |
run_obj creates files for logging model run’s standard output and error streams, as well as path location for the model results, and calls the swift app function run_task_app.
(float result) run_obj(string task_payload, int trial, string instance_dir, string instance_id) {
    file out <instance_dir + "/" + instance_id+"_out.txt">;    (1)
    file err <instance_dir + "/" + instance_id+"_err.txt">;
    string output_file = "%s/output_%s.csv" % (instance_dir, instance_id);    (2)
    (out,err) = run_task_app(model_sh, task_payload, output_file,  trial, instance_dir) =>    (3)
    result = get_result(output_file);    (4)
}| 1 | Create swift file objects to capture the standard out and standard error from the run_task_app
function. |
| 2 | Create a unique output file name for the trial run that can be passed to the model to write its output. |
| 3 | Call run_task_app. |
| 4 | Call get_result, passing the output file to retrieve the output of the model run from the
output file. |
run_task_app calls scripts/run_my_model.sh passing it the task payload,
the output file path, the trial number, the emews_root location, and the instance directory. The
@stdout and @stderr commands are used by swift to redirect the standard out and standard
error streams to files specified in run_obj.
// app function used to run the task
app (file out, file err) run_task_app(file shfile, string task_payload, string output_file, int trial, string instance_dir) {
    "bash" shfile task_payload output_file trial emews_root instance_dir @stdout=out @stderr=err;
}
The final two functions are the result calculations. These need to be completed by the user and are marked with the appropriate TODOs.
(float result) get_result(string output_file) {
    // TODO given the model output, set the the model result
    result = 0.0;
}

(float agg_result) get_aggregate_result(float model_results[]) {
    // TODO replace with aggregate result calculation (e.g.,
    // take the average of model results with avg(model_results);
    agg_result = 0.0;
}
eqsql_worker_pool.cfg contains configuration variables for running the worker pool. It is sourced
by the submission script run_eqsql_worker_pool.sh to retrieve the database connection parameters, the HPC scheduler parameters, and the other variables required by the workflow.
The intention here is that these parameters are the most frequently changed between
different workflow runs, and rather than edit the submission script itself, it is easier to edit
a short configuration file.
The cfg file begins with the HPC and general workflow setup parameters.
CFG_WALLTIME=01:00:00    (1)
CFG_QUEUE=queue    (2)
CFG_PROJECT=project    (3)
NODES=4    (4)
CFG_PPN=4    (5)
CFG_PROCS=$(( NODES * CFG_PPN )) (6)| 1 | Set the estimated duration of the workflow. |
| 2 | Set the queue on which to run the workflow. |
| 3 | Set the project under which to run the workflow. |
| 4 | Set the number of HPC nodes to run the workflow with. |
| 5 | Set the number of process per node (PPN) to use. |
| 6 | Compute the total number of processes to allocate to the job by multiplying the number of nodes by the PPN. |
The database connection parameters are used by the swift script to connect to the EQSQL database. The postgresql database requires a user, database, hostname, and optional port when connecting. Those are specified here.
# Database port - this can be left empty
# for local conda postgresql install
CFG_DB_PORT=    (1)
CFG_DB_USER=eqsql_user    (2)
CFG_DB_NAME=EQ_SQL    (3)
CFG_DB_HOST=localhost (4)| 1 | Set the database port. If using the default local database configuration, no port needs to be specified. |
| 2 | Set the database user name. This defaults to eqsql_user under the default local database
configuration. |
| 3 | Set the database name. This defaults to EQ_SQL under the default local database configuration. |
| 4 | Set the database host name. This defaults to localhost under the default local database
configuration. |
The final set of parameters sets the number of trials, the worker pool id, the task type the worker pool will retrieve, and the task query parameters.
CFG_TRIALS=10    (1)
CFG_POOL_ID=default    (2)
# Update this to match the task / work type
CFG_TASK_TYPE=0    (3)
CFG_BATCH_SIZE=$(( CFG_PROCS + 2 ))    (4)
CFG_BATCH_THRESHOLD=1    (5)
CFG_DB_RETRY_THRESHOLD=10 (6)| 1 | Set the number of trials / replicates to perform |
| 2 | Set the unique identifier for the worker pool |
| 3 | Set the task type that the worker pool will retrieve from the database. |
| 4 | Set the batch size for batch task querying. The worker pool will request up to this number of tasks to own at a time. For example, if the batch size is 33, and the worker pool currently owns 30 uncompleted tasks, it will only obtain 3 additional tasks when querying the output queue. |
| 5 | Set the batch query threshold which specifies how large the deficit between requested tasks and owned tasks must be before more tasks are obtained. |
A worker pool can request and own all the task in the database by setting CFG_BATCH_SIZE to a number
greater than the number of expected tasks. A smaller number, however, allows an ME to manipulate the database output queue re-prioritizing existing unowned tasks, for example.
|
run_my_model.sh is called by eqsql_worker_pool.swift to execute the model as if the model has been run from the command line. The script passes model input parameters (the payload string), the output file for the
model to use, the trial number for this set of parameters, the emews root directory location, and the instance directory that was created in eqsql_worker_pool.swift. run_my_model.sh includes two important TODOs.
You will need to update the MODEL_CMD variable to specify the model executable, and the arg_array to
specify the command line parameters to the model command.
The script begins with defining an optional TIMEOUT that will timeout the model if its
run duration exceeds that value.
# Check for an optional timeout threshold in seconds. If the duration of the
# model run as executed below, takes longer that this threshold
# then the run will be aborted. Note that the "timeout" command
# must be supported by executing OS.

# The timeout argument is optional. By default the "run_model" swift
# app function sends 5 arguments, and no timeout value is set. If there
# is a 6th (the TIMEOUT_ARG_INDEX) argument, we use that as the timeout value.

# !!! IF YOU CHANGE THE NUMBER OF ARGUMENTS PASSED TO THIS SCRIPT, YOU MUST
# CHANGE THE TIMEOUT_ARG_INDEX !!!
TIMEOUT=""
TIMEOUT_ARG_INDEX=6    (1)
if [[ $# ==  $TIMEOUT_ARG_INDEX ]]
then
	TIMEOUT=${!TIMEOUT_ARG_INDEX}
fi

TIMEOUT_CMD=""
if [ -n "$TIMEOUT" ]; then
  TIMEOUT_CMD="timeout $TIMEOUT"
fi| 1 | If this script is passed TIMEOUT_ARG_INDEX number of arguments,
then that argument (defaulting to the 6th argument) will be used as
the number of seconds after which to timeout. |
The next section of the script assigns the scripts command line arguments to variables and changes the directory to the instance directory passed to the script.
# Set PARAM_LINE from the first argument to this script
# PARAM_LINE is the string containing the model parameters for a run.
PARAM_LINE=$1

# Set the name of the file to write model output to.
OUTPUT_FILE=$2

# Set the TRIAL_ID - this can be used to pass a random seed (for example)
# to the model
TRIAL_ID=$3

# Set EMEWS_ROOT to the root directory of the project (i.e. the directory
# that contains the scripts, swift, etc. directories and files)
EMEWS_ROOT=$4

# Each model run, runs in its own "instance" directory
# Set INSTANCE_DIRECTORY to that and cd into it.
INSTANCE_DIRECTORY=$5
cd $INSTANCE_DIRECTORY
The final section defines the model executable in MODEL_CMD, the arguments to
that executable in arg_array and runs the model with the optional timeout.
# TODO: Define the command to run the model. For example,
# MODEL_CMD="python"
MODEL_CMD=""    (1)
# TODO: Define the arguments to the MODEL_CMD. Each argument should be
# surrounded by quotes and separated by spaces. For example,
# arg_array=("$EMEWS_ROOT/python/my_model.py" "$PARAM_LINE" "$OUTPUT_FILE" "$TRIAL_ID")
arg_array=("arg1" "arg2" "arg3")    (2)

# Turn bash error checking off. This is
# required to properly handle the model execution
# return values and the optional timeout.
set +e
echo "Running $MODEL_CMD ${arg_array[@]}"

$TIMEOUT_CMD "$MODEL_CMD" "${arg_array[@]}"    (3)

# $? is the exit status of the most recently executed command (i.e the
# line above)
RES=$?
if [ "$RES" -ne 0 ]; then
	if [ "$RES" == 124 ]; then
    echo "---> Timeout error in $COMMAND"
  else
	   echo "---> Error in $COMMAND"
  fi
fi| 1 | Define the model executable. For a stand alone compiled executable, this will be
the path to that executable. For example, something like $HOME/sfw/epi_model-1.0/bin/epimodel.
For a model written in an interpreted language such as R or Python, this will be the Rscript or python
executable. |
| 2 | Define the array of arguments to pass to the MODEL_CMD executable. At the very
least, this will typically include the PARAM_LINE variable in order to pass the
task payload input parameters to the model. For an R or Python application, this will also include
the path to the R or Python code to run. |
| 3 | Run the model with the optional TIMEOUT_CMD. If no TIMEOUT was specified, the TIMEOUT_CMD
will be an ignored empty string. |
If the me_language argument to the eqsql template command is python, then an example Python ME and ME configuration file will be produced. The ME can be run from the command line as follows:
$ python3 algo.py -h
usage: algo.py [-h] exp_id config_file

positional arguments:
  exp_id       experiment id
  config_file  yaml format configuration file

optional arguments:
  -h, --help   show this help message and exit
The two command line parameters to algo.py are:
-
exp_id- an experiment identifier for the current run the workflow (e.g., epi_model_experiment_3). -
config_file- the path to the ME configuration file (e.g.,algo_cfg.yaml)
The bare example ME contains two functions and a if name == 'main' section.
def create_parser():
    parser = argparse.ArgumentParser()
    parser.add_argument('exp_id', help='experiment id')
    parser.add_argument('config_file', help="yaml format configuration file")
    return parser


if __name__ == '__main__':
    parser = create_parser()
    args = parser.parse_args()
    params = cfg.parse_yaml_cfg(args.config_file)

    run(args.exp_id, params)
The create_parser function creates the command line arguments, and the main section
loads the configuration file into a Python dictionary, and calls the run function, passing it
the params dictionary.
The run function starts the EQ/SQL database, and the worker pool, and creates a task queue
for submitting tasks to the database output queue to be retrieved by the worker pool for
execution.
def run(exp_id: str, params: Dict):    (1)
  ...
  # start database
  db_tools.start_db(params['db_path'])    (2)
  db_started = True

  # start local task queue
  task_queue = local_queue.init_task_queue(params['db_host'], params['db_user'],    (3)
                                           port=None, db_name=params['db_name'])

  # check if the input and output queues are empty,
  # if not, then exit with a warning.
  if not task_queue.are_queues_empty():    (4)
      print("WARNING: db input / output queues are not empty. Aborting run", flush=True)
      return

  # start worker pool
  pool_params = worker_pool.cfg_file_to_dict(params['pool_cfg_file'])
  pool = worker_pool.start_local_pool(params['worker_pool_id'],    (5)
                                      params['pool_launch_script'],
                                      exp_id, pool_params)
  task_type = params['task_type']
  fts = []

  # TODO: submit some tasks to DB, and append the returned eqsql.eq.futures to (6)
  # the list of futures. For example:

  # payloads = [json.dumps({'x': random.uniform(0, 10), 'y': random.uniform(0, 10)}) for _ in range(100)]
  # _, fts = task_queue.submit_tasks(exp_id, task_type, payloads)

  # TODO: do something with the completed futures. See the EQSQL documentation
  # for more options. For example:
  # for ft in task_queue.as_completed(fts):
# print(ft.result())| 1 | The params dictionary contains all the parameters used to initialize the workflow. These will be explained in more detail in the configuration file discussion. |
| 2 | Start the database located at the db_path parameter. |
| 3 | Initialize a task queue for submitting tasks to the database queue. |
| 4 | Check if the database input and output queues are empty before submitting tasks. If not, then abort the run. |
| 5 | Start the worker pool using the worker pool related configuration parameters. |
| 6 | Once the initialization is complete, the task_queue can be used to submit
tasks (model input parameters) to the database output queue, and to retrieve
and use the results returned by the worker pool to the database input queue. |
The body of the run function is wrapped in a try … finally clause
in order to shutdown the database, worker pool, and task queue as cleanly
as possible in the event of an error occurring.
|
algo_cfg.yaml is a yaml format file used configure the example ME. The file begins with the
database related parameters. These parameters are used by the example ME algorithm to
start and connect to the database.
# TODO: Edit DB properties if necessary
db_path: /home/nick/tmp/db    (1)
db_host: localhost    (2)
db_user: eqsql_user    (3)
db_name: EQ_SQL    (4)
# db_port can be empty for local run
db_port: (5)| 1 | Set the db_path variable to the location of the db directory. The ME will use this to start the database. |
| 2 | Set the database host name. This defaults to localhost under the default local database
configuration. |
| 3 | Set the database user name. This defaults to eqsql_user under the default local database
configuration. |
| 4 | Set the database name. This defaults to EQ_SQL under the default local database configuration. |
| 5 | Set the database port. If using the default local database configuration, no port needs to be specified. |
The remaining parameters are used by the ME when working with the worker pool.
worker_pool_id: default    (1)
task_type: 0    (2)

pool_launch_script: ../swift/run_eqsql_worker_pool.sh    (3)
pool_cfg_file: ../swift/cfgs/eqsql_worker_pool.cfg (4)| 1 | Set a worker pool id. The example ME assigns this id to the worker pool when it starts it using
the pool_launch_script. |
| 2 | Set the type of task for the worker pool to consume. |
| 3 | Set the worker pool launch script. The example ME will use this script to start the worker pool. This location is relative to the configuration file’s location. |
| 4 | Set the configuration file for the worker pool. This location is relative to the configuration file’s location. |
The eqsql package contains a utility function for parsing EQ/SQL yaml format configuration files.
The eqsql.cfg.parse_yaml_cfg function will attempt to resolve ~ into the user’s home directory,
and relative paths for any entries ending in file, script, or path. The relative paths will
be resolved using the configuration file location, when those paths begin with . or ...
|
B.5. INIT DB
EMEWS Creator also includes an init_db command that creates a fully initialized EQSQL database
in a user specified directory. init_db creates a postgresql database cluster in a specified path,
then creates a user and database in that cluster, and finally populates that database with the required
eqsql tables. init_db requires that the postgresql binaries, initdb, pg_ctl, 'createuser, and
createdb are in the user’s PATH, or that the directory path is specified via the --pg-bin-path argument.
Usage:
$ emewscreator init_db [OPTIONS]

Options:
  -d, --db-path PATH      Database directory path. The database will be
                          created in this directory.  [required]
  -u, --db-user TEXT      The database user name
  -n, --db-name TEXT      The database name
  -p, --db-port INTEGER   The database port, if any.
  -b, --pg-bin-path PATH  The path to postgresql's bin directory (i.e., the
                          directory that contains the pg_ctl, createuser and
                          createdb executables)
  -h, --help              Show this message and exit.
init_db takes the following arguments:
-
--db-path- the directory in which to create the database cluster. This must not already exist, and will be created by the command. -
--db-user- the database user’s name, defaults toeqsql_user -
--db-name- the name of the database to create, defaults toEQ_SQL -
--db-port- an optional port number for the database to listen for connections on, if any -
--pg-bin-path- the path to a directory containing postgresql’sinitdb,pg_ctl,createuser, andcreatedbexecutables, defaults to an empty string in which case the executables are assumed to be in the user’s PATH.
The create cluster, create database, and create tables steps that init_db executes,
can be performed individually if necessary using the create_db_cluster, create_db, and
create_db_tables commands described below. This can be useful when an HPC resource provides
it’s own database service, for example, and the user only needs to create the required EQ/SQL tables.
|
B.6. CREATE DB CLUSTER
The create_db_cluster command creates a postgresql database cluster in a specified directory. create_db_cluster requires that the postgresql executable initdb is in the user’s PATH, or that the directory path is specified via the --pg-bin-path argument.
Usage:
$ emewscreator create_db_cluster [OPTIONS]

Options:
  -d, --db-path PATH      Database directory path. The cluster will be created
                          in this directory.  [required]
  -b, --pg-bin-path PATH  The path to postgresql's bin directory (i.e., the
                          directory that contains the initdb executable)
  -h, --help              Show this message and exit.
create_db_cluster takes the following arguments:
-
--db-path- the directory in which to create the database cluster. This must not already exist, and will be created by the command. -
--pg-bin-path- the path to a directory containing postgresql’sinitdbexecutable, defaults to an empty string in which case the executable is assumed to be in the user’s PATH.
B.7. CREATE DB
The create_db command creates an eqsql database and and eqsql user in a specified postgresql database cluster. create_db requires that the postgresql executables, pg_ctl, createuser, and createdb are in the user’s PATH, or that the directory path is specified in the --pg-bin-path argument.
Usage:
$ emewscreator create_db [OPTIONS]

Options:
  -d, --db-path PATH      Database directory path. The database will be
                          created in this directory.  [required]
  -u, --db-user TEXT      The database user name
  -n, --db-name TEXT      The database name
  -p, --db-port INTEGER   The database port, if any.
  -b, --pg-bin-path PATH  The path to postgresql's bin directory (i.e., the
                          directory that contains the pg_ctl, createuser and
                          createdb executables)
  -h, --help              Show this message and exit.
create_db takes the following arguments:
-
--db-path- the database cluster directory -
--db-user- the database user’s name, defaults toeqsql_user -
--db-name- the name of the database to create, defaults toEQ_SQL -
--db-port- an optional port number for the database to listen for connections on, if any -
--pg-bin-path- the path to a directory containing postgresql’spg_ctl,createuser, andcreatedbexecutables, defaults to an empty string in which case the executables are assumed to be in the user’s PATH.
B.8. CREATE DB TABLES
The create_db_tables command creates the required database tables in the specified database.
create_db_tables requires that the postgresql’s pg_ctl executable is in the user’s PATH, or
that the directory path is specified in the --pg-bin-path argument.
Usage:
emewscreator create_db_tables [OPTIONS]

Options:
  -d, --db-path PATH      Database directory path. The tables will be created
                          in the database in this directory.  [required]
  -u, --db-user TEXT      The database user name
  -n, --db-name TEXT      The database name
  -p, --db-port INTEGER   The database port, if any.
  -b, --pg-bin-path PATH  The path to postgresql's bin directory (i.e., the
                          directory that contains the pg_ctl, createuser and
                          createdb executables)
  -h, --help              Show this message and exit.
create_db_tables takes the following arguments:
-
--db-path- the database cluster directory -
--db-user- the database user’s name, defaults toeqsql_user -
--db-name- the name of the database in which to create the tables, defaults toEQ_SQL -
--db-port- an optional port number for the database to listen for connections on, if any -
--pg-bin-path- the path to a directory containing postgresql’spg_ctlexecutable, defaults to an empty string in which case the executable is assumed to be in the user’s PATH.
Appendix C: Using Swift/T
C.1. Overview
The Swift language allows the developer to rapidly implement workflows. The Swift/T implementation of Swift focuses on high-performance workflows to utilize TOP500 machines. Such systems are characterized by high concurrency (tens of thousands of processor cores or more) and low-latency networks. Swift/T can utilize these systems well, producing over a billion tasks per second. As a workflow language, Swift composes existing software components into an overall workflow. The following sections describe Swift/T features relevant to EMEWS. For more details, see the Swift/T website.
C.2. Syntax
The Swift language uses C-like syntax and conventional data types such as int, float, and string. It also has typical control constructs such as if, for, and foreach. Swift code can be encapsulated into functions, which can be called recursively. As shown in the snippet below, Swift can perform typical arithmetic and string processing tasks quite naturally. Swift also has a file type, that allows dataflow processing on files.
import io; // for printf()
add(int v1, int v2) {
  printf("v1+v2=%i", v1+v2);
}
int x1 = 2;
int x2 = string2int("2");
add(x1, x2);$ swift-t add.swift
v1+v2=4C.3. External execution
Swift is primarily designed to call into external user code, such as simulations or analysis routines implemented in various languages. Like many other systems, Swift/T supports calls into the shell. However, this is not efficient at large scale, and so Swift/T also supports calls into native code libraries directly.
An example use of Swift for shell tasks is shown in the snippet below. This example demonstrates a fragment of a build system. The user defines two app functions, which compile and link a C language file. Swift app functions differ from other Swift functions in that they operate primarily on variables of type file.
Other forms of external execution in Swift/T allow the user to call into native code (C/C++/Fortran) directly by constructing a package with SWIG. Such libraries can be assembled with dynamic or static linking; in the static case, the Swift script and the native code libraries are bundled into a single executable with minimal system dependencies for the most efficient loading on a large-scale machine.
app (file o) gcc(file c, string optz) {
  "gcc" "-c" "-o" o optz c;
}
app (file x) link(file o) {
  "gcc" "-o" x o;
}
file c        = input("f.c");
file o<"f.o"> = gcc(c, "-O3");
file x<"f">   = link(o);
C.4. Concurrency
The key purpose of Swift is to gain concurrency easily and correctly. This is accomplished in Swift through the use of dataflow instead of control flow. In Swift, there is no instruction pointer, execution is triggered as soon as possible limited only by data availability. This results in an implicitly parallel programming model. Two modes of concurrency are shown in the following snippet, both based on the ready availability of i. Computing the ith Fibonacci number relies on two concurrent recursive calls, and iteration over an array of known values allows for parallel execution. Ordering can be forced with the statement1 ⇒ statement2 syntax, which creates an artificial dependency.
(int o) fib(int i) {
  if (i < 2) {
    ... // base cases
  }
  else {
    o = fib(i-1) + fib(i-2);
  }
}

foreach i in [0:N-1] {
  simulate(i);
}
C.5. Support for interpreted languages
Swift/T also provides high-level, easy to use interfaces for Python, R, Julia, Tcl, and JVM languages, allowing the developer to pass a string of code into the language interpreter for execution (via its C or C++ interface). These interpreters are optionally linked to the Swift runtime when it is built. This allows the user to tightly integrate Swift logic with calls to the interpreters, as the interpreter does not have to be launched as a separate program for each call. This is a crucially significant performance benefit on very large scale supercomputers, enabling us to make millions of calls to the interpreter per second.
C.5.1. Python
Many users desire to access Python from the top level of the scientific workflow; and optionally call down from the interpreted level into native code, to gain high-performance operations for numerical methods or event-based simulation. A popular example of this model is Numpy, which provides a high-level interface for interaction, with high-performance, vendor-optimized BLAS, LAPACK, and/or ATLAS numerical libraries underneath.
One use of Python from Swift/T is shown in the following snippet. In this example, a short module is defined in F.py which provides an function named f() that simply performs addition. A call to this function from Swift/T is shown in python-f.swift. The string containing the Python code is populated with Swift’s Python-inspired % operator, which fills in values for x and y at the conversion specifiers %i. The Python function F.f() receives these values, adds them, and returns the result as a string. Swift receives the result in z and reports it with the Swift builtin trace() function.
Using this technique, massively parallel ensembles of Python tasks can be orchestrated by Swift. Data can easily be passed to and from Python with Pythonic conventions; only stringification is required. At run time, the user simply sets PYTHONPATH so that the Python interpreter can find module F, and runs swift-t.
def f(x, y):
return str(x+y)import python;
x = 2; y = 3;
z = python("import F",
"F.f(%i,%i)" % (x,y));
trace(z);$ export PYTHONPATH=$PWD
$ swift-t python-f.swift
trace: 5C.5.2. R
The R support in Swift/T is similar to the Python support. An example use case is shown here:
1
2
3
4
5
6
7
8
9
10
11
12
13
14
15
16
17
18
19
20
21
import io; (1)
import string;
import files;
import R;
app (file o) simulation(int i) { (2)
"bash" "-c"
("RANDOM=%i; echo $RANDOM" % i)
@stdout=o;
}
string results[]; (3)
foreach i in [0:9] {
f = simulation(i);
results[i] = read(f);
}
A = join(results, ","); (4)
code = "m = mean(c(%s))" % A;
mean = R(code, "toString(m)");
printf(mean);
This script intends to run a collection of simulations in parallel, then send result values to R for statistical processing.
| 1 | This simply imports requisite Swift packages. |
| 2 | This defines the external simulation program, which is implemented as a call to the Bash shell random number generator, seeded with the simulation number i. The output goes to temporary file o. |
| 3 | This calls the simulation a number of times, reading the output number from disk and storing it in the array results. |
| 4 | This computes the mean of results via R. It joins the results into an R vector, constructed with the R function c(), uses the R function mean(), and returns the mean as a string mean that is printed by Swift with printf(). |
References
Boussaïd, Ilhem, Julien Lepagnot, and Patrick Siarry. 2013. “A Survey on Optimization Metaheuristics.” Information Sciences, Prediction, Control and Diagnosis using Advanced Neural Computations, 237 (July): 82–117. https://doi.org/10.1016/j.ins.2013.02.041.
Collier, Nicholson, and Michael North. 2013. “Parallel Agent-Based Simulation with Repast for High Performance Computing.” SIMULATION 89 (10): 1215–35. https://doi.org/10.1177/0037549712462620.
Ozik, Jonathan, Nicholson T. Collier, and Justin M. Wozniak. 2015. “Many Resident Task Computing in Support of Dynamic Ensemble Computations.” In 8th Workshop on Many-Task Computing on Clouds, Grids, and Supercomputers Proceedings. Austin, Texas. http://datasys.cs.iit.edu/events/MTAGS15/program.html.
Ozik, Jonathan, Nicholson T. Collier, Justin M. Wozniak, and Carmine Spagnuolo. 2016. “From Desktop to Large-Scale Model Exploration with Swift/T.” In 2016 Winter Simulation Conference (WSC), 206–20. https://doi.org/10.1109/WSC.2016.7822090.
Ozik, Jonathan, Justin M Wozniak, Nicholson Collier, Charles M Macal, and Mickaël Binois. 2021. “A Population Data-Driven Workflow for COVID-19 Modeling and Learning.” The International Journal of High Performance Computing Applications 35 (5): 483–99. https://doi.org/10.1177/10943420211035164.
Settles, Burr. 2012. “Active Learning.” Synthesis Lectures on Artificial Intelligence and Machine Learning 6 (1): 1–114. https://doi.org/10.2200/S00429ED1V01Y201207AIM018.
Wozniak, J. M., T. G. Armstrong, M. Wilde, D. S. Katz, E. Lusk, and I. T. Foster. 2013. “Swift/T: Large-Scale Application Composition via Distributed-Memory Dataflow Processing.” In 2013 13th IEEE/ACM International Symposium on Cluster, Cloud, and Grid Computing, 95–102. IEEE. https://doi.org/10.1109/CCGrid.2013.99.
Wozniak, Justin M., Rajeev Jain, Prasanna Balaprakash, Jonathan Ozik, Nicholson T. Collier, John Bauer, Fangfang Xia, et al. 2018. “CANDLE/Supervisor: a Workflow Framework for Machine Learning Applied to Cancer Research.” BMC Bioinformatics 19 (18): 491. https://doi.org/10.1186/s12859-018-2508-4.